Unreal Engine
Unreal Engine is an industry grade, robust game engine. While previous engines offered UnrealScript for implementing new behavior, Unreal Engine 4 uses C++ exclusively along with visual programming “Blueprints” that generate bytecode by default.
Editor
Pressing F in the camera pane will move the camera to focus onto the selected object.
Pressing and holding ALT while dragging left-click will orbit the focused object, while dragging right-click will zoom in and out of the object.
Geometry brushes have built-in behavior for collision, tessellation, and material tiling. They are used to “block out” an environment and then they are converted to static meshes.
A brush face can be selected by holding CTRL + SHIFT + left-click on a face. All faces can then be selected by going to the Geometry drop-down and selecting Select all adjacent faces.
Objects such as brushes can be duplicated by copy-pasting or by holding ALT while transforming the object.
Physics simulation can be enabled for an object by going to its Physics section of the Details panel and ticking the Simulate Physics checkbox.
The physics of an object can be constrained to specific planes, such as the YZ-plane, by using the Constraints field in the Physics section of the Details panel.
A trigger volume is one that emits an event if an actor collides with it.
Directory Structure
A project contains the following directory structure as well as the Unreal Project File .uproject which can be opened in the Unreal Editor.
Assets are stored as .uasset files in the Content folder, and can include Materials, Static and Skeletal Meshes, Blueprints, Sound Cues, Textures, and reusable reference materials and templates.
maps are stored as .umap files within the Content folder. The Unreal Editor works with one map at a time, which is displayed in the Viewport.
The root directory contains the following directories as well as a directory for each game project:
- Engine: engine source, content, etc.
- Templates: project templates
- GenerateProjectFiles.bat: creates UE4 Visual Studio solution
- UE4Games.uprojectdirs: tells UnrealBuildTool where to find projects
Both the Engine and game project directories have some directories in common:
- Binaries: built binaries and other built objects
- Build: build files
- Config: configuration files for engine settings. Those in game project configuration files override those in the Engine directory.
- Content: engine and game content, including asset packages and maps
- DerivedDataCache: cached derived data files generated on-load
- Intermediate: temporary build files, such as shaders in game directories
- Saved: autosaves, configuration files, and logs. The Engine’s directory also contains crash logs, hardware information, and more.
- Source: contains engine and game source, tools, gameplay classes, etc.
- Engine:
- Developer: source common to editor and engine
- Editor: editor source
- Programs: external tools used by engine and editor
- Runtime: engine source
- Game: organized with a directory per module, each containing:
- Classes: gameplay class headers (.h)
- Private: gameplay class and module implementations (.cpp)
- Public: module header
- Engine:
The Engine directory also contains:
- Documentation: source markdown and published HTML documentation
- Extras: helper and utility files
- Plugins: engine plugins
- Programs: configuration files and logs for root projects such as UnrealFrontEnd and UnrealHeaderTool
- Shaders: shader source files (.usf)
Each game project directory contains:
- Binaries: built binaries
- Config: default game settings
- Content: engine or game content, including asset packages and maps
- External dependencies: public engine headers (Visual Studio)
- Intermediate: files generated by UnrealBuildTool such as Visual Studio projects
- Saved: configuration files and logs
- Source:
- Classes: game object class definitions (.h)
- Private: private game object class implementations (.cpp)
- Public: public game object class implementations (.cpp)
Solution directories contain:
- Classes: game object class definitions (.h)
- Config: default game settings
- External dependencies: public engine headers (Visual Studio)
- Private: private game object class implementations (.cpp)
- Public: public game object class implementations (.cpp)
Terminology
The base object type UObject implements garbage collection, support for exposing object metadata to the Unreal Editor via the UProperty macro, and serialization.
An Actor is any object that can be placed in a level. It supports 3D transformations and can be spawned and destroyed. An actor can be moved with the SetActorLocation method, for example. Example actors include StaticMeshActor, CameraActor, and PlayerStartActor.
A Component encapsulates functionality that can be added to an Actor.
A Pawn is an Actor that can be possessed (controlled) by a player or AI, not assumed to be humanoid. The DefaultPawn class contains a spherical CollisionComponent, StaticMeshComponent, and a DefaultPawnMovementComponent with a no-gravity, flying movement style. The SpectatorPawn class is a subclass of DefaultPawn and is useful for spectating functionality.
A Character is a Pawn that is specifically intended for use by a player (as opposed to an AI). It includes collision setup via CapsuleComponent, input bindings, movement behavior via CharacterMovementComponent, and some animation-related functionality. Its movement can be replicated smoothly across the network.
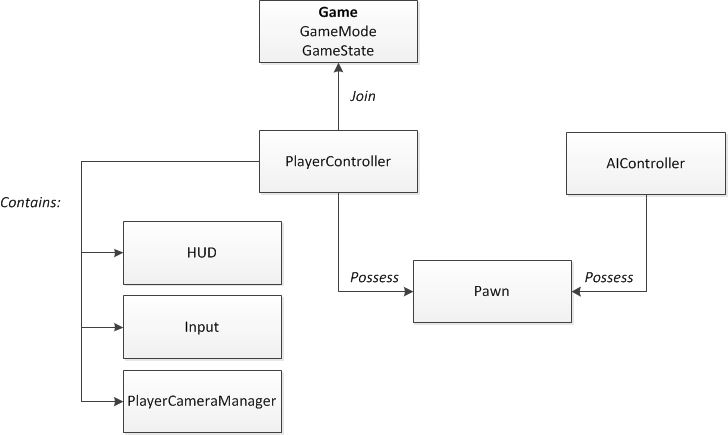
A Controller is an Actor that controls a Pawn. Controllers receive notifications for many of the events for the possessed Pawn, allowing it to intercept and even supercede the Pawn’s default behavior. A Controller can be made to tick before a Pawn, minimizing latency between input processing and Pawn movement. By default a Controller controls a single Pawn at any given time, but this can be changed for certain games such as RTSes.
A PlayerController is used to translate human input into game interactions through a possessed Pawn or Character. In a multiplayer setting, the server has a PlayerController instance for each player in the game and network calls are routed and processed by the corresponding player’s PlayerController. From a player (client)’s perspective they can only communicate with the server through the PlayerController.
A PlayerController can have a heads-up display (HUD), a CameraComponent, a CameraActor which is used to calculate its position and orientation, and a PlayerCameraManager, which as the name suggestions, manages how the player camera behaves.
An AIController is similar to a PlayerController except that it is meant to possess a Pawn that represents an NPC. Note that Pawns and Characters have a base AIController by default unless specifically possessed by a PlayerController or told not to create an AIController.
The CameraActor class is mainly a wrapper for CameraComponent so that it can be placed directly in the level rather than within another class. The CameraComponent has two components to aid in visual placement: a StaticMeshComponent representing the camera’s placement and a FrustumComponent representing the camera’s field of view, whose appearance must be enabled in the editor under the Viewport’s Show → Advanced → Camera Frustums menu.
The PlayerCameraManager by default blends between pending view targets and debug cameras triggered by console commands. It queries the ViewTarget for what to do for the camera’s viewpoint. The ViewTarget provides the PlayerCameraManager with the ideal point of view (POV). In order to do this, it maintains information on the target Actor, the Actor’s Controller (for non-locally controlled Pawns), and the PlayerState, in order to follow the same player through Pawn transitions while spectating, for example.
A CameraComponent provides the ViewTarget information if a CameraActor or any Actor that contains a CameraComponent and has bFindCameraComponentWhenViewTarget set. The camera view is obtained from the first found CameraComponent via an Actor’s CalcCamera function. If none exists or the property is off, it uses the Actor’s location and rotation. A PlayerController also has the CalcCamera function which returns the location of the possessed pawn, if one exists, and the control rotation of the PlayerController. One level higher, the PlayerCameraManager uses the UpdateViewTarget function to query the ViewTarget, returning its Point of View.
Game-specific camera behavior can be provided at any point within the camera responsibility chain beginning with the CameraComponent, then Actor or PlayerController, then PlayerCameraManager.
A Brush is an Actor that describes a 3D volume used to define level geometry (known as BSPs) and gameplay volumes. BSP Brushes are often used to block-out levels. Volume Brushes are often used for Blocking Volumes (invisible; impede Actor passage), Pain Causing Volumes (damage over time on collision), or Trigger Volumes (trigger events on entry/exit).
A Level (aka Map) is a user-defined area of gameplay, and are mainly defined by the properties of the Actors contained within them. A level corresponds to a .umap file.
A World consists of a list of loaded Levels, and handles streaming the levels and spawning dynamic Actors.
A GameMode is responsible for setting the game rules, such as the maximum number of players, spawn locations and their behavior, whether it can be paused, level transitions, and game-specific behavior like win conditions such as whichever player crosses the finish line first is the winner. The default GameMode can be set in the Project Settings and can be overridden by a Level. In a multiplayer setting, the GameMode only exists on the server and the rules are replicated to each client. It should not have much data that changes during play, and definitely not transient data that clients need to know about.
The default game mode for all maps in a project can be set in the /Script/EngineSettings.GameMapsSettings section of the DefaultEngine.ini configuration file. A specific map’s GameMode can be set through the World Settings tab with the GameMode Override setting. It’s also possible to override the game used via the game query parameter to the map path given to the game when the -game argument is passed. It’s also possible to register game modes with map name prefixes. For example, the map name prefix “DM” can be associated with a game mode UTDMGameMode by specifying it in the /Script/EngineSettings.GameMapSettings section of the DefaultEngine.ini configuration file with the +GameModeMapPrefixes and +GameModeClassAliases settings:
[/Script/EngineSettings.GameMapsSettings]
+GameModeMapPrefixes=(Name="DM",GameMode="/Script/UnrealTournament.UTDMGameMode")
+GameModeClassAliases=(Name="DM",GameMode="/Script/UnrealTournament.UTDMGameMode")
The new AGameModeBase (>=4.14) is the base of all GameModes, which itself is a simplified, streamlined version of the original AGameMode, which now derives from the new class. The AGameMode class is suited for a traditional multiplayer shooter.
The InitGame function runs before Actors run their PreInitializeComponents function (including the GameMode instance, which itself is an Actor) and is used to initialize parameters and spawn helper classes.
The PreLogin function determines whether to accept or reject a player attempting to join the server. The PostLogin function is called after a successful login and can be used to call replicated functions which invoke the PlayerController::OnPostLogin handler. The HandleStartingNewPlayer is called after PostLogin or after a seamless travel and is usually used to create a Pawn for the player. The RestartPlayer is used to start spawning the player’s Pawn. The SpawnDefaultPawnAtTransform function actually performs the spawn. The Logout function is called when the player leaves or is destroyed.
It is common to create a separate GameMode for each match format, mission type, or special zone, though only one is in use at any given moment, instantiated whenever a level is initialized for play via UGameEngine::LoadMap.
Meanwhile, rule-related game events may trigger game state mutations which need to be tracked by all players in a GameState. The GameState may contain information such as the match duration (beyond when a particular player joined), when a particular player joined, the GameMode’s base class, and whether the game has begun. In other words, it should manage information meant to be known to all connected clients that is specific to the GameMode but not specific to any particular player.
The base GameState class is AGameStateBase. Some of the functionality that this class provides is GetServerWorldTimeSeconds which yields the server’s UWorld::GetTimeSeconds, which is synchronized between the server and the client, the PlayerArray which is the array of all APlayerState objects, which is useful for performing actions on all players, and the HasBegunPlay function which determines if the BeginPlay function has been invoked on all Actors.
The PlayerState contains information specific to a particular player, be it a human player or bot simulating a player (not non-player AI), This information can be the player’s name, score, or health. Each player’s PlayerState is replicated from the server to each client.
User Interface
Heads-up displays (HUD) are generally for non-interactive game state, while user interfaces are for interactive elements drawn on the screen (like a HUD) or onto a surface in the world.
The HUD class is the base object for displaying elements overlaid on the screen. Each human-controlled player has their own instance of the AHUD class which draws to their individual Viewport. For example, while a split-screen multiplayer game may have multiple Viewports sharing the same screen, each HUD draws to its own Viewport.
The Canvas object can be used in the HUD’s render loop to draw low-level elements (text, texture and material tiles, triangles, shapes) to the screen.
Slate is a user interface framework that facilitates the design of user interfaces for tools (e.g. Unreal Editor) or games.
Unreal Motion Graphics UI Designer (UMG) is a visual UI authoring tool that can be used to create HUDs, menus, or other interfaces.
It appears that the use of Slate is now preferred over the use of UMG.
Code Style
Many classes have a prefix character that denotes their expected usage or lineage. Type definitions should have a prefix corresponding to the prefix that would be used on for underlying type. These prefixes are actually expected by UnrealHeaderTool.
T: Template classU: Inherits fromUObjectA: Inherits fromAActorS: Inherits fromSWidgetI: Abstract interfaceE: Enumb: Boolean variableF: most other classes
The Unreal Engine source code style is to keep each brace on its own line.
Unreal Build System
The UnrealHeaderTool (UHT) does custom parsing and code-generation to facilitate the UObject system. First when UHT is invoked, C++ headers are parsed for Unreal-related class metadata in order to generate custom code to implement the various UObject features. Then the regular C++ compiler is invoked to compile the resulting code.
Each engine module has its own .build.cs file that controls how it is built by defining module dependencies, libraries to link, additional include paths, etc. Each module is compiled into shared libraries (DLLs on Windows) and loaded by a single binary. Instead of shared libraries, each module can be statically linked into the binary via the BuildConfiguration.cs file.
The Unreal Build System’s build process executes independently of IDE project files (.sln or .vcproj), which are mainly used for editing purposes, and are generated dynamically based on the project source tree with the GenerateProject.bat script.
The UnrealBuildTool (UBT) supports the following targets:
- Game: standalone game, requires cooked data
- Client: “Game” target without server code; for network clients
- Server: “Game” target without client code; for dedicated servers
- Editor: for extending the Unreal Editor
- Program: for standalone utility programs built on UE
Targets are declared in .target.cs files within the Source/ directory. Such a file declares a class deriving from the TargetRules class, with properties set in its constructor for how it should be built. When UBT is asked to build a target, it compiles the eponymous file and instantiates the class to determine its settings.
Engine Architecture
Object System
Marking classes, properties, and functions with the corresponding Unreal macros turns them into UClasss, UPropertys, and UFunctions, which exposes them to the Unreal Engine.
UObjects are automatically zeroed on initialization before their constructors are invoked, both native members and UPropertys.
Garbage Collection
The engine maintains a reference graph of UObjects that are periodically flagged for destruction. The “root set” consists of the objects at the root of the graph. Any UObject can be added to the root set. Any UObjects not found in the reference graph are assumed unneeded and will be removed. This can be done in a separate thread, known as multithreaded reachability analysis.
Objects can be retained by marking them as a UProperty or keeping them in an engine container such as TArray. Actors are usually referenced by an Object that is directly or indirectly linked to the root set, such as through a Level in which they were placed, while their Components are linked to the root set through the Actor that they belong to.
Actors can be explicitly marked for destruction through the AActor::Destroy function, while Components have the UActorComponent::DestroyComponent function.
All references to a destroyed or otherwise removed AActor or UActorComponent that is visible to the reflection system are automatically nulled, including UPropertys and those stored in Unreal Engine containers such as TArray, so as to prevent dangling pointers from persisting. A weak pointer can be created via TWeakObjectPtr for cases where an Object pointer should not be a UProperty.
All references to a UObject UProperty are also nulled when an asset is “Force Deleted” within the Editor.
By default the garbage collector clusters UObjects so that an entire cluster is checked instead of each individual Object, which generally improves garbage collection performance and decreases time spent on reachability analysis.
Furthermore, clusters can optionally be merged when one Object references an Object in another. This is irreversible, so that even if the reference that caused the merge is severed, the cluster remains. This may prevent collection in some cases since any reference to any object within the cluster will keep the entire cluster from being collected.
Actors can merged into clusters if the feature is enabled and the actor opts-in by setting its bCanBeInCluster property or overriding the CanBeInCluster function to return true. This is usually useful for Actors that are expected to be destroyed all at once, such as indestructible static meshes that are only destroyed by unloading the level. By default only StaticMeshActors and Reflection Capture Components opt-in.
It’s also possible to configure the amount of time between collections, which generally decreases the likely amount of unreachable objects that will be discovered in the next reachability analysis pass.
Run-Time Type Information
UObjects know their UClass, which facilitates run-time type checking and casting.
class ALegendaryWeapon : public AWeapon
{
  void SlayMegaBoss()
  {
    TArray<AEnemy> EnemyList = GetEnemyList();

    // The legendary weapon is only effective against the MegaBoss
    for (AEnemy Enemy : EnemyList)
    {
      AMegaBoss* MegaBoss = Cast<AMegaBoss>(Enemy);

      if (MegaBoss)
      {
        Incinerate(MegaBoss);
      }
    }
  }
};
Each UObject has a typedef named Super that is set to its parent class, which can be used to invoke behavior in the parent class.
class AEnemy : public ACharacter
{
  virtual void Speak()
  {
    Say("Time to fight!");
  }
};

class AMegaBoss : public AEnemy
{
  // "Powering up! Time to fight!"
  virtual void Speak()
  {
    Say("Powering up! ");
    Super::Speak();
  }
};
Serialization
Serializing UObjects consists of serializing its UProperty values unless they’re marked Transient or if they are unchanged from the post-constructor default value. Any UPropertys that were added receive default values from the CDO, while those removed are simply ignored.
Custom behavior can be defined by overriding the UObject::Serialize function, which is often used for detecting data errors, checking version numbers, or performing data migrations.
When a UClass’s CDO is changed, the engine attempts to apply those changes to future instances when they are loaded as long as the instance’s copy of the member that was changed in the CDO has the previous CDO’s value (i.e. the previous default), otherwise it’s assumed that the instance explicitly requested a non-default value for a reason.
Gameplay Modules
Each game is modular just like the engine is. Each gameplay module is a collection of related classes usually resulting in shared libraries (just like engine modules). At the very least, each gameplay module must have a header file, implementation file, and build file.
Multiple gameplay modules may result in better link times and faster code iteration at the expense of more interfacing glue code.
MyGame/Source/MyModule/Public/MyModule.h:
#include "Engine.h"
#include "EnginePrivate.h"
#include "MyModuleClasses.h" // UHT-generated
MyGame/Source/MyModule/Private/MyModule.cpp:
// Include our game's header file
#include "MyModule.h"

// Designate the module as primary
IMPLEMENT_PRIMARY_GAME_MODULE(MyModule, "MyGame");
MyGame/Source/MyModule/MyModule.build.cs:
using UnrealBuildTool;

public class MyModule : ModuleRules
{
    public MyModule(TargetInfo Target)
    {
        PublicDependencyModuleNames.AddRange(new string[] { "Core", "Engine" });
        PrivateDependencyModuleNames.AddRange(new string[] { "RenderCore" });
    }
}
The module must then be registered in the DefaultEngine.ini configuration file.
In the EditPackages array of the UnrealEd.EditorEngine section:
[UnrealEd.EditorEngine]
+EditPackages=MyModule
The Launch section:
[Launch]
Module=MyModule
And the NativePackages array of the /Script/Engine.UObjectPackages section:
[/Script/Engine.UObjectPackages]
+NativePackages=MyModule
Gameplay Classes
Each gameplay class has a header and implementation. Using the C++ Class Wizard automatically creates the header and implementation files and configures the game module. By convention, the file names omit the Unreal Engine standard prefixes, so that AActor is defined in Actor.h, although the engine places no formal relationship between the class and file name.
Each gameplay class header should include, as the final inclusion, the UHT-generated header file named after the class in question with a .generated. infix marker, so that MyClass.h would include MyClass.generated.h.
A class is registered with Unreal Engine through the UCLASS() macro which describes how the class’ corresponding UClass should be constructed.
The Abstract class specifier prevents the user from creating instances of that class, which includes adding Actors of that class with the Unreal Editor. An example would be ATriggerBase.
The Blueprintable class and interface specifier exposes the class as an acceptable base class for a Blueprint. The default is NotBlueprintable. Inherited.
The BlueprintType class specifier exposes the class as a type that can be used for variables in Blueprints.
The ClassGroup class specifier can be used to specify the group name under which to show this class in the Actor Browser.
The Config class specifier indicates that the class can store data in a configuration file for any configurable variables in the class declared with the config or globalconfig variable specifiers.
The Const class specifier indicates that all properties and functions in the class are const and should be exported as const. Inherited.
The DefaultToInstanced class specifier indicates that all instances should be considered “instanced,” which are duplicated upon construction. Inherited.
The DependsOn class and interface specifier can be used to specify one or more classes that are compiled before this class. This is useful when using structs or enums declared in another class.
The Deprecated class specifier marks the class as deprecated, and objects of that class will not be saved when serializing (presumably because it may not be possible to read it back). Inherited.
The MinimalAPI class and interface specifier causes only the type information to be exported for use by other modules, so that they can cast to it but not invoke its functions (besides inline methods), which improves compile times.
The PerObjectConfig class specifier indicates that the object’s configuration will be stored per-object where each object will have its own section named [ObjectName ClassName]. Inherited.
The Placeable class specifier indicates that the class can be created and placed within a level, UI scene, or Blueprint (depending on the class type). Inherited. Can override with NonPlaceable.
The Transient class specifier indicates that objects of this class should never be persisted to disk, particularly for use with native classes that are non-persistent by nature, such as players or windows. Inherited. Can override with NonTransient.
The Within class specifier indicates that its objects cannot exist outside of an instance of the given class name, so that in order to instantiate this class, an instance of the given class name must be specified as its Outer object.
The BlueprintSpawnableComponent class metadata specifier allows the component class to be spawned by a Blueprint.
The GENERATED_BODY() macro must be at the very top of the class definition for the UHT to inject the generated code.
The UCLASS macro gives a UObject a reference to a UClass that contains a set of properties and functions that describe its Unreal-based type. The UClass keeps an object called the Class Default Object (CDO) which is an object initialized by the UObject constructor which serves as the “template object,” an object whose properties are copied to every new instance of that UObject.
Objects are automatically garbage collected. The MarkPendingKill function nullifies all pointers to the object and then deletes the object on the next garbage collection.
The UClass and the CDO can be retrieved for any object, but they should be considered read-only. The UClass is accessible through the GetClass function.
UCLASS([specifier, …], [meta(key=value, …)])
class ClassName : public ParentName
{
  GENERATED_BODY()
}
The constructors are used to set default values for properties and necessary initialization. They’re generally defined in the implementation file, but they can be defined inline in the class declaration, in which case the CustomConstructor specifier must be passed to its UCLASS() invocation to prevent the UHT from generating a corresponding declaration which would clash with the inline definition.
A constructor variant can take an FObjectInitializer which can be used to override properties and sub-objects. For example, the following prevents the superclass of AMyObject from creating the sub-objects named "SomeComponent" and "SomeOtherComponent".
AMyObject::AMyObject(const FObjectInitializer& ObjectInitializer)
  : Super(ObjectInitializer
            .DoNotCreateDefaultSubobject(TEXT("SomeComponent"))
            .DoNotCreateDefaultSubobject(TEXT("SomeOtherComponent")))
{
    // Initialize CDO properties here.
}
UObject provides the following functionality:
- garbage collection
- reference updating
- reflection
- serialization
- automatic updating of default property changes
- automatic property initialization
- editor integration
- run-time type information
- network replication
UObjects can be instantiated in a variety of ways.
The NewObject<Type>() function instantiates with an auto-generated name and takes as optional parameters the object’s Outer and the UClass to instantiate, which by default is determined by the template type parameter.
template<class T>
T *NewObject
(
  // The object's Outer.
  UObject *Outer (UObject *)GetTransientPackage(),

  // The UClass to instantiate.
  UClass *Class = T::StaticClass()
)
The NewNamedObject<Type>() function instantiates with the specified name. It takes as parmeters the object’s Outer, the name to use, optional object flags, and the template object to use as the CDO. It asserts that the name conflicts with the instance’s Outer.
template<class T>
T *NewNamedObject
(
  UObject *Outer,

  // The object name.
  FName Name,

  // Object flags.
  EObjectFlags Flags = RF_NoFlags,

  // Archetype object which is treated as the CDO.
  UObject const *Template=NULL
)
The ConstructObject<Type>() function instantiates with all available creation options for maximum flexibility. It calls StaticConstructionObject which allocates the object, calls its ClassConstructor, and performs any further initialization such as loading configuration or localization properties and instancing components.
template<class T>
T* ConstructObject
(
  UClass *Class,
  UObject *Outer = (UObject *)GetTransientPackage(),
  FName Name = NAME_None,
  EObjectFlags SetFlags = RF_NoFlags,
  UObject const *Template = NULL,

  // If true, copy transients from CDO instead of from Template archetype object.
  bool bCopyTransientsFromClassDefaults false,

  // Contains mappings of instanced objects and components to their templates.
  // For instancing components owned by the new object.
  struct FObjectInstancingGraph *InstanceGraph = NULL
)
The EObjectFlags enumeration can be used to describe the spawned Object. It can be used to control the type of object being created (e.g. CDO, transient), its garbage collection behavior (e.g. part of root set, unreachable), and its lifetime phase (e.g. needs loading, being loaded, pending destruction).
It’s also possible to instantiate a UObject using a direct new operator invocation, which allows for passing constructor arguments.
Hard-coded asset references are discouraged due to their brittle nature. To avoid looking-up assets on each constructor call (which involves searching), it is done once and cached through a ConstructorStatics struct, which is created once and then simply referenced by subsequent instantiations. The ConstructorHelpers namespace contains the FObjectFinder function which can be used to find an asset.
ATimelineTestActor::ATimelineTestActor()
{
  // One-time initialization
  struct FConstructorStatics
  {
    ConstructorHelpers::FObjectFinder<UStaticMesh> Object0;
    FConstructorStatics()
      : Object0(TEXT("StaticMesh'/Game/Mesh/S_Health.S_Health'")) {}
  };
  static FConstructorStatics ConstructorStatics;

  // Property initialization
  StaticMesh = ConstructorStatics.Object0.Object;
}
Similarly, the ConstructorHelper::FClassFinder can be used to find a reference to a particular UClass. Although it’s usually possible and easier to just use the class’s StaticClass function which yields the UClass, e.g. USomeClass::StaticClass(), unless it’s a cross-module reference.
APylon::APylon(const class FObjectInitializer& ObjectInitializer)
: Super(ObjectInitializer)
{
  // Structure to hold one-time initialization
  static FClassFinder<UNavigationMeshBase> ClassFinder(
    TEXT("class'Engine.NavigationMeshBase'"));

  if (ClassFinder.Succeeded())
  {
    NavMeshClass = ClassFinder.Class;
  }
  else
  {
    NavMeshClass = nullptr;
  }
}
When an Actor is spawned, all of its components are cloned from the CDO, so they must be added to the object graph, so that they may be properly garbage collected, by keeping a reference to them within the class, which should be stored as a UPROPERTY.
UCLASS()
class AWindPointSource : public AActor
{
  GENERATED_BODY()

  public:
  UPROPERTY()
  UWindPointSourceComponent* WindPointSource;

  UPROPERTY()
  UDrawSphereComponent* DisplaySphere;
};
It’s then possible to create component sub-objects and attach them to the Actor’s hierarchy. It’s also possible to access and/or modify the parent components via GetAttachParent, GetParentComponents, GetNumChildrenComponents, GetChildrenComponents, and GetChildComponent on any USceneComponent including the root component.
AWindPointSource::AWindPointSource()
{
  // Create a new component named "WindPointSourceComponent0.
  WindPointSource = CreateDefaultSubobject<UWindPointSourceComponent>(
    TEXT("WindPointSourceComponent0"));

  // Set our new component as the RootComponent of this actor,
  // or attach it to the root if one already exists.
  if (RootComponent == nullptr)
  {
    RootComponent = WindPointSource;
  }
  else
  {
    WindPointSource->AttachTo(RootComponent);
  }

  // Attach this component to the component we just created.
  DisplaySphere = CreateDefaultSubobject<UDrawSphereComponent>(
    TEXT("DrawSphereComponent0"));

  DisplaySphere->AttachTo(RootComponent);

  // Set some properties on the new component.
  DisplaySphere->ShapeColor.R = 173;
  DisplaySphere->ShapeColor.G = 239;
  DisplaySphere->ShapeColor.B = 231;
  DisplaySphere->ShapeColor.A = 255;
  DisplaySphere->AlwaysLoadOnClient = false;
  DisplaySphere->AlwaysLoadOnServer = false;
  DisplaySphere->bAbsoluteScale = true;
}
Functions
Functions can be marked up with the UFUNCTION macro which, like UCLASS, accepts function specifiers. Assuming that the appropriate function specifiers are set, these functions could be:
- called and overridden from Blueprints.
- assigned as delegates within the default properties of a class.
- used as replication callbacks, which are invoked when the associated variable changes.
- executed through the console.
UFUNCTION([specifier, …], [meta(key=value, …)])
ReturnType FunctionName([Parameter, …])
Parameters can be marked up with the UPARAM macro.
The ref param specifier marks a reference parameter as an input parameter as opposed to the assumed output parameter.
The DisplayName param specifier specifies how the parameter should appear in the Blueprint editor.
It’s possible to add function parameter specifiers out or optional. The out specifier declares the parameter as being passed by reference, allowing it to be modified by the function. The optional specifier marks certain parameters as optional, and an optional default value can be specified with the usual C++ syntax for default arguments.
The BlueprintAuthorityOnly function specifier prevents the function from running in a Blueprint if running on something that lacks network authority.
The BlueprintCallable function specifier allows the function to be called from a Blueprint or a Level Blueprint.
The BlueprintCosmetic function specifier prevents the function from running on dedicated servers.
The BlueprintImplementableEvent function specifier allows the function to be overridden in a Blueprint or Level Blueprint.
The BlueprintNativeEvent function specifier allows the function to be overridden by a Blueprint but also has a default native implementation. The native implementation is defined by a function of the same name with an _implementation suffix, which the generated code automatically calls when necessary. These are more costly than BlueprintImplementableEvent.
The BlueprintPure function specifier allows the function to be called from a Blueprint or Level Blueprint and assures that the function does not affect the owning object or any other global state.
The Category function specifier can be used to specify the category under which to display the function in the Blueprint editor, with a vertical bar | separating the major and sub-category.
The Client function specifier indicates that the function is only executed on the client that owns the Object that the function belongs to. A native implementation can be defined as with BlueprintNativeEvent,
The CustomThunk function specifier can be used to manually define the execSomeFunc thunk function that executes the native implementation of functions marked BlueprintNativeEvent or Client.
The Exec function specifier indicates that the function can be called from the in-game console. This only works for functions within certain classes.
The NetMulticast function specifier indicates that the function is executed on the server and replicated to all clients regardless of the Actor’s NetOwner.
The Reliable function specifier indicates that the function should be replicated over the network in a guaranteed manner 1 regardless of badnwidth or network errors.
The Unreliable function specifier indicates that the function should be replicated over the network without any guarantees.
The Sserver function specifier indicates that the function is only executed on the server. A native implementation can be defined as with BlueprintNativeEvent,
There are also function metadata specifiers.
The BlueprintInternalUseOnly function metadata specifier marks the function as an internal implementation detail used to implement another function or node, so as not to directly expose it in a graph.
The BlueprintProtected function metadata specifier restricts the function call on the Blueprint’s this, so that it cannot be called on another instance.
The DeprecatedFunction function metadata specifier marks the function as deprecated so that any Blueprint references cause a compilation warning. The deprecation warning message can be customized via the DeprecationMessage function metadata specifier.
The UnsafeDuringActorConstruction function metadata specifier marks the function as unsafe to call during Actor construction.
Structs
Structs can be marked with the USTRUCT macro. The generated body is inserted via the GENERATED_BODY macro.
USTRUCT([Specifier, …])
struct StructName
{
  GENERATED_BODY()
};
The Atomic struct specifier indicates that the struct must be serialized as a single unit.
The BlueprintType struct specifier allows the struct to be used for variables in Blueprints.
The NoExport struct specifier indicates that no code be generated for the struct, so that the header is only provided to parse metadata from.
Interfaces
Interfaces are declared with a regular U-prefixed class that inherits from the UInterface class and is marked with the UINTERFACE macro.
UINTERFACE([specifier, …], [meta(key=value, …)])
class UClassName : public UInterface
{
  GENERATED_BODY()
};
This class is not an actual interface, but merely an empty class that simply exists for Unreal Engine’s reflection system’s purposes. The actual implementation for the interface is expected in a class named with an I prefix instead of a U prefix.
#pragma once

#include "ReactToTriggerInterface.generated.h"

UINTERFACE(Blueprintable)
class UReactToTriggerInterface : public UInterface
{
  GENERATED_BODY()
};

// Note that the actual implementation uses an I-prefix
class IReactToTriggerInterface
{
  GENERATED_BODY()

public:
  // React to a trigger volume activating this object.
  // Return true if the reaction succeeds.
  UFUNCTION(BlueprintCallable, BlueprintImplementableEvent,
            Category="Trigger Reaction")
  bool ReactToTrigger() const;
};
Any class wishing to implement the interface must derive from the interface implementation class with the I-prefix.
class ATrap : public AActor, public IReactToTriggerInterface
{
  GENERATED_BODY()

public:
  virtual bool ReactToTrigger() const override;
};
It’s possible to dynamically test if a given class implements an interface via the U-prefix interface’s UClass’s ImplementsInterface function or by attempting to cast to the interface’s implementation type (I-prefix).
bool bIsImplemented = Object->GetClass()->ImplementsInterface(UReactToTriggerInterface::StaticClass());

// null if it doesn't implement the interface
IReactToTriggerInterface* ReactingObject = Cast<IReactToTriggerInterface>(Object);
More generally, it’s possible to cast from one interface to another provided that the object implements both.
// ReactingObject will be non-null if the interface is implemented.
IReactToTriggerInterface* ReactingObject = Cast<IReactToTriggerInterface>(Object);

// non-null if ReactingObject is non-null and also implements IOtherInterface.
IOtherInterface* OtherInterface = Cast<IOtherInterface>(ReactingObject);

// non-null if ReactingObject is non-null and Object is an AActor or AActor-derived class.
AActor* Actor = Cast<AActor>(ReactingObject);
The CannotImplementInterfaceInBlueprint interface metadata specifier prevents the interface from being implemented by a Blueprint. This is useful if it has only non-exposed C++ methods, for example. More generally, if the interface has any functions that aren’t BlueprintImplementableEvent or BlueprintNativeEvent then it must be marked as CannotImplementInterfaceInBlueprint, since the Blueprint would be unable to implement those methods.
Properties
Class properties can be marked up with the UPROPERTY macro.
UPROPERTY([specifier, …], [meta(key=value, …)])
VariableType VariableName;
By convention, integers should use types which designate their size, such as uint64 or int32.
Integer properties can be exposed to the Editor as bitmasks by using the Meta property Bitmask. This causes the Editor to show a generically-named entry in a drop-down for each possible flag for that integer width.
An integer property designated as a Bitmask can also be associated with an enumeration, so that each enumeration is displayed in the drop-down.
UENUM(Meta = (Bitflags))
enum class EColorBits
{
  ECB_Red,
  ECB_Green,
  ECB_Blue
};

// In class
UPROPERTY(Editanywhere, Meta = (Bitmask, BitmaskEnum = "EColorBits"))
int32 ColorFlags;
The Editor interprets Boolean values to be bool or a bit-field.
Four core string types are supported.
FStringwhich is a dynamically-sized string similar tostd::stringFNamewhich is an interned, immutable, case-insensitive stringFTextwhich is a robust string representation that supports localization
The TCHAR type is used for characters. The TEXT() macro is used to denote string literals made up of TCHAR.
There are a variety of property specifiers that control how the property should behave.
The AdvanceDisplay property specifier puts the property in the Advanced drop-down in the Editor.
The AssetRegistrySearchable property specifier automatically adds the property to the asset registry for any asset class instance containing the property. Does not apply to structs or parameters.
The BlueprintAssignable property specifier only applies to multi-cast delegates and serves to expose the property for assigning in Blueprints.
DECLARE_DYNAMIC_MULTICAST_DELEGATE_OneParam(FOnItemRemoved, FItemStruct, RemovedItem);

UCLASS(meta=(BlueprintSpawnableComponent))
class UInventoryComponent : public UActorComponent
{
  GENERATED_BODY()

public:
  UPROPERTY(BlueprintAssignable)
  FOnItemRemoved OnItemRemoved;
};
The BlueprintReadOnly property specifier indicates that the property can be read by Blueprints but not modified.
The BlueprintReadWrite property specifier indicates that the property can be read and written by a Blueprint.
The Category property specifier specifies the category that the property should appear under in the Editor, with nested categories delimited by a vertical bar |.
The Config property specifier makes the property configurable, so that its current value can be saved in a configuration file and loaded when created. As a result, it cannot be given a value in default properties. This implied ReadOnly.
The GlobalConfig property specifier works like the Config property specifier except that it cannot be overridden in a subclass.
The BlueprintCallable property specifier only applies to multi-cast delegates and serves to expose the delegate for calling from Blueprints.
The Const property specifier indicates that the variable is const and should be exported as const, so that it will not be modifiable in the editor.
The DuplicateTransient property specifier specifies that the variable’s value should be reset to the CDO’s value whenever the object is copied (e.g. copy-pasted, binary duplication).
The EditAnywhere property specifier specifies that the property can be edited by property windows on archetypes and instances.
The EditDefaultsOnly property specifier indicates that the property can be edited by property windows but only on archetypes, not instances.
The EditInstanceOnly property specifier indicates that the property can be edited from property windows but only on instances, not archetypes.
The EditFixedSize property specifier only applies to dynamic arrays and serves to prevent the user from changing the length of the array from within property windows.
The EditInline property specifier allows the user to edit the object property’s properties within the property inspector. Primarily useful for object references, including arrays of them.
The VisibleAnywhere property specifier indicates that the property be visible in property windows, but not editable.
The VisibleDefaultsOnly property specifier indicates that the property be visible in property windows for archetypes, but not editable.
the VisibleInstanceOnly property specifier indicates that the property be visible in property windows for instances and not archetypes, but not edible.
The Export property specifier only applies to object properties (or arrays of them) and indicates that the object should be deep-copied exported in its entirety as a sub-object block when it’s copied, instead of a simple shallow-copy (copying the reference).
The Instanced property specifier only applies to object properties and causes any reference assignments to the property to instead reference a unique copy of the assigned object. Primarily useful for instancing sub-objects defined in CDO properties.
The Interp property specifier indicates that the value can be interpolated over time by a track in the Matinee editor.
The Localized property specifier primarily applies to strings and indicates that the property will have a localized value.
The Native property specifier indicates that the property is native, so that native code is responsible for serializing it and exposing it to the garbage collector.
The NoClear property specifier prevents the object reference from being nullified from the editor. It hides the “Clear” and “Browse” button.
The NoExport property specifier is primarily applies to native classes and indicates that the variable should not be included in the auto-generated class declaration.
The NonTransactionl property specifier indicates that changes to the variable should not be included in the Editor’s undo history.
The Ref property specifier only applies to function parameter declarations and specifies that the value is to be copied out after a function call.
The Replicated property specifier indicates that the variable should be replicated.
The ReplicatedUsing property specifier indicates that the variable should be replicated and that it should invoke the specified callback when it is received.
The RepRetry property specifier primarily applies to structs and instructs the engine to retry a failed replication. This is the default behavior for simple references but not structs due to the bandwidth cost.
The SaveGame property specifier indicates that the property should be included in the checkpoint or save system. A proxy archiver is then used to read and write the specified properties.
The SerializeText property specifier indicates that the native property should be serialized as text.
The SimpleDisplay property specifier indicates that the property should appear in the Details panel.
The Transient property specifier indicates that the property is transient and should not be saved. It is zeroed at load time.
Enumerations
Enumerations can be marked up with the UENUM macro. Generally the BlueprintType enum specifier is provided to expose the enumeration type to the editor. Individual enumerations can be marked up with the UMETA macro, which is useful for setting the DisplayName meta specifier, which specifies the name that the enumeration should appear as in the editor.
UENUM(BlueprintType)
enum class EDamageElement : uint8
{
  DE_Earth  UMETA(DisplayName="Earth"),
  DE_Fire   UMETA(DisplayName="Fire"),
  DE_Water  UMETA(DisplayName="Water")
};
The ENUM_CLASS_FLAGS macro can be used to automatically define all bitwise operators for an enumeration class, except for boolean checks, for which the enumeration must define a None enumeration set to 0 which is tested against explicitly.
An enumeration can be marked as a UPROPERTY as long as it is based on a uint8.
// Old way.
UPROPERTY()
TEnumAsByte<EDamageElement> MyProperty;

// New way.
UPROPERTY()
EDamageElement MyProperty;
Fields that should only be accessible by derived classes should be made private with protected accessors.
Classes that should not be derived from should be marked final.
Actors
An actor is an object that can be placed in a level. They support 3D transformations and can be spawned and destroyed. The base class is AActor. Note that although actors support 3D transformations they don’t actually store the Transform data. Instead, the Actor’s root component’s Transform data is used instead.
The SpawnActor function can be used to spawn an Actor.
Actors are essentially containers for Components, which control how the Actor moves, renders, etc.
All Actors have the ability to tick each frame or at a user-defined interval so that calculations can be updated or actions performed. Actors tick via the Tick function, while ActorComponents tick via TickComponent.
Actors are generally not garbage collected since the World Object holst a list of Actor references, but they can be explicitly destroyed via Destroy, which removes them from the level and marks them for removal.
An Actor can be loaded from disk when it’s already in a level, via LoadMap or AddToWorld.
- Actors in a package or level are loaded from the disk
PostLoadcalled by serialized Actors when they’re finished loading. Custom versioning and fixup occurs here. It’s mutually exclusive withPostActorCreated.InitializeActorsForPlayRouteActorInitializeis called for any non-initialized Actor in order to cover seamless travel carry-over.PreInitializeComponentsis called beforeInitializeComponentis called on the Actor’s ComponentsInitializeComponentis a helper function for the creation of each component defined on the ActorPostInitializeComponentsis called after the Actor’s components have been initialized.
BeginPlayis called when the level is started
When an actor is instantiated for Play-in-Editor, the Actors in the Editor are duplicated into a new World and PostDuplicate is called, then the process follows as with step #3 of the loading-from-disk process.
When an Actor is spawned, the following process is followed:
SpawnActoris calledPostSpawnInitializePostActorCreatedis called for spawned Actors after their creation, so initialization go there. It’s mutually exclusive withPostLoad.ExecuteConstructionOnConstructionis the construction of the Actor, where Blueprint Actors create their components and initialize their Blueprint variables
PostActorConstructionPreInitializeComponentsis called beforeInitializeComponentis called on the Actor’s ComponentsInitializeComponentis a helper function for the creation of each component defined on the ActorPostInitializeComponentsis called after the Actor’s components have been initialized.
OnActorSpawnedis broadcast on theUWorldBeginPlayis called
It’s possible for an Actor to be Deferred Spawned by setting any property to “Expose on Spawn.” In that case, the following process is followed:
SpawnActorDeferredis called and is meant to spawn procedural Actors, allowing for additional setup before the Blueprint construction- Everything in
SpawnActoroccurs, then afterPostActorCreated:- Call various initializers with the valid but incomplete Actor instance
FinishSpawningActoris called to finalize the Actor- Continue at the
ExecuteConstruction
The EndPlay function guarantees that an Actor’s life is coming to an end by marking it as RF_PendingKill so that it’s removed on the next garbage collection cycle. It is called in many places such as:
- the
Destroyfunction - Play-in-Editor ended
- Level Transitions, be it seamless travel or load map
- when a streaming level containing the Actor is unloaded
- Actor’s lifetime has expired
- application shutdown
To check if an Actor is pending kill, an attempt should be made to acquire a weak pointer FWeakObjectPtr<TheActor>.
During destruction, while an object is being garbage collected, the following process is followed:
BeginDestroyis called to allow the Actor to free any resources. Gameplay-related destruction behavior should occur inEndPlayIsReadyForFinishDestroyis called by the garbage collector to determine whether the object is ready to be deallocated, which means that the object can returnfalseto defer its destruction until the next GC pass.FinishDestroyis called when the object is finally going to be destroyed and is the final chance to free up internal data structures
You can use GetActorForwardVector() to get the Actor’s forward vector.
Components
UActorComponent is the base class of Component. It can Tick. They’re associated with an Actor but don’t exist in the world. They’re for conceptual functionality like AI or interpreting player input.
USceneComponent is an ActorComponent that has a transform. SceneComponents can be attached hierarchically. An Actor’s transform is taken from the root SceneComponent if there is one.
UPrimitiveComponent is a SceneComponent with a graphical representation, physics, and collision properties, such as a mesh or a particle system.
Components are registered in a scene with the RegisterComponent function, so that they may be updated each frame. That function calls RegisterComponentWithScene to ensure that the component is present in the Actor’s Components array, is associated with the scene, and creates a render proxy and physics state for it.
ActorComponents are automatically registered when their owning Actor is spawned as long as they are created as sub-objects and were added to the Components array in the Actor’s default properties. Otherwise they can be registered dynamically via RegisterComponent. A Component can override the following registration callbacks:
OnRegisterwhich allows for additional component initializationCreateRenderStatewhich initializes the Component’s render stateOnCreatePhysicsStatewhich initializes the Component’s physics state
A Component can be unregistered to prevent it from being updated, simulated, or rendered by calling the UnregisterComponent function, which triggers the following callbacks:
OnUnRegisterwhich allows for additional actions to occur when unregisteringDestroyRenderStatewhich uninitializes the Component’s render stateOnDestroyPhysicsStatewhich uninitializes the Component’s physics state
A Component can be updated each frame as long as they are registered, are set to tick by disabling bComponentNEverTicks, and define the TickComponent function.
A Component’s render state must exist for it to be rendered. It can be used to indicate to the Engine when the render data needs to be updated, in which case the render state is marked dirty so that it may be updated at the end of the current frame.
A Component’s physics state must exist for it to be simulated by the physics engine. Unlike the render state, physics changes happen immediately.
Since SceneComponents have an associated transform, they can be attached to one another. An attached SceneComponent has an AttachParent property that points to the parent SceneComponent that they’re attached to. This is generally used to allow one Component to contain multiple other Components.
This also makes it possible to “attach” one Actor to another, although what’s actually happening is that a SceneComponent from one is being attached to the SceneComponent in another. Naturally, since each Component can only have a single parent, only the attached Actor’s root component can be attached to another Actor’s component, otherwise only the subtree rooted at the attached Component would be attached, which would essentially leave the Actor unaffected since it takes on its root Component’s transform.
The ComponentToWorld FTransform contained in a SceneComponent describes its world-relative transform and is generally for internal use. A SceneComponent also contains a RelativeLocation vector, RelativeRotation rotator, and RelativeScale3D vector which together describe the Component’s transform relative to their parent, unless the bAbsoluteLocation, bAbsoluteRotation, and bAbsoluteScale properties are set in which case they are world-relative. It’s possible to set world-relative translation and rotation transforms despite the value of those properties with the SetWorldLocation and SetWorldRotation functions.
PrimitiveComponents are SceneComponents that create or generate geometry that is rendered and/or used as collision data. Examples include CapsuleComponent which generates geometry used for collision detection, and StaticMeshComponent and SkeletalMeshComponent which contain pre-built geometry and can also be used for collision detection.
A PrimitiveComponent contains an FPrimitiveSceneProxy which encapsulates scene data that is mirrored to facilitate rendering the primitive in parallel to the game thread. A subclass of FPrimitiveSceneProxy is created for each primitive type in order to hold the render data necessary to render that type of primitive.
The canonical Actor-spawning function is on UWorld and takes a variety of arguments for fine-grained spawning configuration. The only required argument is the UClass of the Actor to spawn. Some optional arguments include:
- a name to give the Actor
- a location and rotation
- a template Actor whose properties should be copied (instead of the CDO)
- whether to fail the spawn if it collides
- who the Actor’s owner will be
- the instigator: the Actor will be responsible for damage caused by the spawned Actor
AActor* UWorld::SpawnActor
(
  UClass*         Class,
  FName           InName,
  FVector const*  Location,
  FRotator const* Rotation,
  AActor*         Template,
  bool            bNoCollisionFail,
  bool            bRemoteOwned,
  AActor*         Owner,
  APawn*          Instigator,
  bool            bNoFail,
  ULevel*         OverrideLevel,
  bool            bDeferConstruction
)

// Example
AKAsset* actor = (AKAsset*)GetWorld()->SpawnActor(AKAsset::StaticClass(), NAME_None, &Location);
Several templated functions exist for common spawning cases.
One exists which spawns an Actor at the location and rotation of the Actor performing the spawn, and automatically returns a pointer of the Actor’s type so no casting is necessary.
template<class T>
T* SpawnActor (
  AActor* Owner = NULL,
  APawn* Instigator = NULL,
  bool bNoCollisionFail = false
)
{
  return (T*)(GetWorld()->SpawnActor(T::StaticClass(),
                                     NAME_None,
                                     NULL,
                                     NULL,
                                     NULL,
                                     bNoCollisionFail,
                                     false,
                                     Owner,
                                     Instigator));
}

// Example
AHUD *MyHUD = SpawnActor<AHUD>(this, Instigator);
There’s also a variant like this one which takes an explicit Location and Rotation:
template<class T>
T* SpawnActor (
  FVector const& Location,
  FRotator const& Rotation,
  AActor* Owner=NULL,
  APawn* Instigator=NULL,
  bool bNoCollisionFail=false
)
{
  return (T*)(GetWorld()->SpawnActor(T::StaticClass(),
                                     NAME_None,
                                     &Location,
                                     &Rotation,
                                     NULL,
                                     bNoCollisionFail,
                                     false,
                                     Owner,
                                     Instigator));
}

// Example
AController *Controller = SpawnActor<AController>(GetLocation(),
                                                  GetRotation(),
                                                  NULL,
                                                  Instigator,
                                                  true);
There are also variants of each of the above variants which take a UClass and automatically cast to the correct type.
AHUD *MyHUD = SpawnActor<AHUD>(NewHUDClass, this, Instigator);

// With explicit location + rotation
APawn* ResultPawn = SpawnActor<APawn>(DefaultPawnClass,
                                      StartLocation,
                                      StartRotation,
                                      NULL,
                                      Instigator);
Ticking
Ticking can occur on each frame, at minimum time intervals, or not at all. An Actor or Component’s tick group determines when within a given frame it should tick, relative to other frame processes such as physics simulation. Only after a tick group has finished ticking all of the contained actors and components does the next tick group begin ticking. Actors can be updated in parallel if they’re in the same tick group.
Although plain UObjects don’t have any built-in update ability, they can gain it by deriving from FTickableGameObject with the inherits class specifier on UCLASS, so that they may then override the Tick function.
Components, Actors, or entire Tick Groups can declare tick dependencies so that they will not tick until the specified actor or component’s tick has completed.
The available tick groups are:
-
TG_PrePhysics: beginning of frame- This tick group ensures that an Actor’s movement is complete and ready to be factored into the physics simulation.
- Physics data is one frame old (which was used to render the previous frame).
- Appropriate for physics object and physics-based attachments.
-
TG_DuringPhysics: beginning of physics simulation.- Runs during physics simulation, so physics data may be from the previous or current frame.
- Simulation may finish and update engine physics data at any time, even before this group finishes ticking, without indication.
- Appropriate for:
- physics-independent logic
- logic that can afford to be one frame off, such as updating inventory screens or mini-maps, where physics data is irrelevant or coarse enough for one-frame-off to be indistinguishable.
-
TG_PostPhysics: end of physics simulation.- Engine now using current frame’s data.
- Appropriate for weapon or movement traces, such as a laser sight, since the final positions of physics objects are now known.
-
N/A: for latent actions, ticking world timer manager, camera updates, update level streaming volumes and streaming operations
-
TG_PostUpdateWork: after cameras are updated.- Historically for feeding last-possible-moment data to particle systems.
- Appropriate for:
- effects that depend on where the camera is pointed.
- logic intended to run after everything else in the frame, such as resolution of characters trying to perform a mutually exclusive action on the same frame.
-
N/A: deferred Actor spawns created earlier in the frame.
The AddTickPrerequisiteActor and AddTickPrerequisiteComponent functions can be used to declare tick dependencies, so that the calling Actor or Component’s tick function doesn’t begin until the specified Actor or Component’s tick has completed.
Tick dependencies are especially useful when one Actor or Component prepares data that another will need. This provides more explicit, fine-grained (per-object) dependency declarations. Since actors in the same tick group can be updated in parallel, if only individual actors may depend on a few particular other actors, it makes more sense to specify them as dependencies rather than moving the entire group of actors to a later tick group and then needing to wait for the entire previous group to finish before the moved group of actors can begin ticking.
An Actor’s tick function’s settings (the tick group to run in, whether to run at all) is usually set in the constructor via the PrimaryActorTick property. These properties are then registered to take effect in BeginPlay.
PrimaryActorTick.bCanEverTick = true;
PrimaryActorTick.bTickEvenWhenPaused = true;
PrimaryActorTick.TickGroup = TG_PrePhysics;
An Actor’s Components all tick during the Actor’s tick by default, but components can specify their own tick settings via PrimaryComponentTick, in which case the Components are added to lists corresponding to the tick group they belong to.
PrimaryComponentTick.bCanEverTick = true;
PrimaryComponentTick.bTickEvenWhenPaused = true;
PrimaryComponentTick.TickGroup = TG_PrePhysics;
The tick function can be toggled dynamically via SetActorTickEnabled and SetComponentTickEnabled.
An Actor or Component can have multiple tick functions to facilitate ticking multiple times, in different tick groups and with different dependencies per tick function. This is accomplished by creating a struct that derives from FTickFunction and overriding ExecuteTick and DiagnosticMessage, then initializing them in the owner’s constructor, then enabling and registering them by overriding RegisterActorTickFunctions and adding calls to each tick structure’s SetTickFunctionEnable followed by RegisterTickFunction with the owner’s Level as an argument. A tick dependency can be registered from one tick structure to another with the tick structure’s AddPrerequisite function and the target dependency tick structure as an argument.
For example, consider a game with an Animated Actor, a Targeting Reticule Actor, a Laster Sight Actor, and a HUD Actor that displays a meter that fills as long as the laser is pointed at a certain type of target object.
The Animated Actor could be in TG_PrePhysics so that its animation is factored into the physics simulation.
The HUD Actor could be in any group but since it’s physics-independent it can occur in TG_DuringPhysics, so that the physics simulation doesn’t have to wait for the HUD to finish ticking if it were to occur in TG_PrePhysics. Since the physics simulation may not have finished by the time the HUD ticks in this group, it will be based on data from the previous frame, but it is likely to be imperceptible.
The Targeting Reticule could occur in TG_PostPhysics since it needs to trace against the scene as it will be rendered, which is only known after physics simulation has completed. This is also necessary for updating the charging meter value with the correct value. There’s no point in declaring a tick dependency so that it only ticks after the Animated Actor ticks since it’s already in a later tick group, so it’s guaranteed to tick only after all Actors and Components in previous tick groups.
The Laser Sight could occur in TG_PostUpdatework since the particle effect needs to be updated with the final locations of the aiming actor and the reticule. However, it could instead occur in TG_PostPhysics and register a tick dependency so that it only ticks after the Targeting Reticule has ticked. This allows the Laser Sight to tick as soon as it can, but no sooner.
Delegates
Delegates make it possible to call member functions in a generic type-safe way. It’s possible to dynamically bind a member function to an arbitrary object and subsequently call it, even if the caller doesn’t know the object’s type.
Delegates are safe to copy and should generally be passed by reference.
Delegates are declared via a delegate declaration macro depending on the function’s kind of signature. This has the effect of defining a new type that represents a delegate that can bind to a function of that type. The following types are supported:
- those returning a value
- those with up to four “payload” arguments
- those with up to eight function parameters
- those declared as
const
Simple functions with no parameters or return values.
void Function();
DECLARE_DELEGATE(Function);
Functions with one or more parameters.
void Function(ParamType Param);
DECLARE_DELEGATE_OneParam(Function, ParamType);

void Function(ParamType Param, OtherType Param2);
DECLARE_DELEGATE_TwoParams(Function, ParamType, OtherType);
Functions with a return value.
ReturnType Function();
DECLARE_DELEGATE_RetVal(ReturnType, Function);

ReturnType Function(ParamType Param);
DECLARE_DELEGATE_RetVal_OneParam(ReturnType, Function, ParamType);

ReturnType Function(ParamType Param, OtherType Param2);
DECLARE_DELEGATE_RetVal_TwoParams(ReturnType, Function, ParamType, OtherType);
Variants of each of those delegate declaration macros exist for multi-cast, dynamic, and wrapped delegates.
DECLARE_MULTICAST_DELEGATE_*DECLARE_DYNAMIC_DELEGATE_*DECLARE_DYNAMIC_MULTICAST_DELEGATE_*
The delegate system has special handling for certain types of objects. For example, binding a delegate to a member of a UObject causes the delegate system to maintain a weak reference to the object so that IsBound or ExecuteIfBound can be used to only conditionally invoke the delegate when the UObject still exists.
The different bind functions include:
Bindbinds to an existing delegate objectBindStaticbinds a native C++ global functionBindRawbinds a native C++ function pointer (so the pointer may dangle)BindSPbinds to a shared pointer object member function, so that a weak reference to the object is kept andExecuteIfBoundmay be usedBindUObjectbinds a member function on aUObject, so that a weak reference to the object is kept andExecuteIfBoundmay be usedUnBindunbinds the delegate
It’s possible to pre-bind certain arguments by passing them to the Bind* calls, except for dynamic delegates.
MyDelegate.BindRaw(&MyFunction, true, 20);
A delegate can be invoked by calling its Execute function, although they should first be checked via IsBound to ensure that they remain bound, or if the delegate has no return value, the ExecuteIfBound helper function can be used. It’s important to keep in mind that if the function has output parameters and the function ended up not being called, the output parameters will remain uninitialized.
For example, assume that FLogWriter::WriteToLog is meant to be called via a delegate.
class FLogWriter
{
  void WriteToLog(FString);
};
A delegate type is created via the delegate declaration macro that matches the function’s type.
DECLARE_DELEGATE_OneParam(FStringDelegate, FString);
The delegate can then be added to a class. The delegate can then be bound to the function by specifying the class’ type as a template parameter, the instance to invoke the function on, and a pointer to the member function.
class FMyClass
{
  FStringDelegate WriteToLogDelegate;

  FMyClass() {
    // Create an instance of the log writer.
    FSharedRef<LogWriter> LogWriter(new FLogWriter());

    // Bind the delegate to that instance' member function.
    WriteToLogDelegate.BindSP(LogWriter, &FLogWriter::WriteToLog);
  }

  void DoThing() {
    // Do some things.
    WriteToLogDelegate.Execute(Text("Did some things."));

    // Safer when appropriate.
    WriteToLogDelegate.ExecuteIfBound(Text("Did some things."));
  }
};
Dynamic Delegates
A dynamic delegate can be serialized. Their functions can be found by name, and so they are slower than regular delegates. They are declared with the same declaration macros except that they begin with DECLARE_DYNAMIC_ and DECLARE_DYNAMIC_MULTICAST_.
Some helper macros exist for dynamic delegates, each of which takes as arguments the object and the function name.
The BindDynamic macro calls BindDynamic and automatically generates the function name string.
The AddDynamic macro calls AddDynamic on a multi-cast delegate and automatically generates the function name string.
The RemoveDynamic macro calls RemoveDynamic on a multi-cast delegate and automatically generates the function name string.
Multi-cast Delegates
Multi-cast delegates can bind multiple functions that all get called when the delegate fires.
Multi-cast delegates only have weak references to objects and can be copied around easily. Multi-cast delegates cannot use return values. They’re best used to pass around a collection of delegates.
Multi-cast delegates are declared with similar delegate declaration macros except that they contain MULTICAST in their name: DECLARE_MULTICAST_DELEGATE and DECLARe_DYNAMIC_MULTICAST_DELEGATE.
The Add function adds a function to the invocation list.
The AddStatic function adds a native global function.
The AddRaw function adds a native function. May dangle.
The AddSP function adds a member function to a shared-pointer’d object. Keeps a weak reference to the object.
The AddUObject function adds a member function to a UObject. Keeps a weak reference to the object.
The Remove function removes a particular function from the invocation list.
The RemoveAll function removes all functions bound to the particular object. This means that since native statuc functions that are not bound to an object will not be removed.
The Broadcast function invokes all bound functions in an undefined order and except those that may have expired. Note that it is safe to call Broadcast even if nothing is bound, though the same caveat applies with regard to output variable initialization.
Events
Events are similar to multi-cast delegates except that only the class that declares the event may invoke Broadcast, IsBound, and Clear, whereas multi-cast delegates have no such restriction. This allows event objects to be exposed in a public interface.
Events are declared in a manner similar to multi-cast delegates except that there are event-specific declaration macros. All of them take the owner type and the event name as the first and second parameters. The owner is the sole class with permission to invoke the delegates.
The DECLARE_EVENT creates an event with no parameters, then there are variants for the different amount of parameters, such as DECLARE_EVENT_TwoParams.
Events are bound and invoked in a manner similar to multi-cast delegates.
By convention, accessors for events should be named with an On prefix.
public:
  DECLARE_EVENT(FLayerViewModel, FChangedEvent)
  FChangedEvent& OnChanged() { return ChangedEvent; }

private:
  FChangedEvent ChangedEvent;
Note that it’s possible to define an abstract event which can be inherited by derived classes. The derived class needs to specify that the event is derived with the DECLARE_DERIVED_EVENT macro which takes the name of the derived class, a member pointer to the event on the base class, and the new name of the event (which can remain the same).
// Base
class IAssetRegistry
{
  DECLARE_EVENT_OneParam(IAssetRegistry, FAssetAddedEvent, const FAssetData &);
  virtual FAseetAddedEvent& OnAssetAdded() = 0;
}

// Derived
class FAssetRegistery : public IAssetRegistry
{
  DECLARE_DERIVED_EVENT(FAssetRegistry, IAssetRegistry::FAssetAddedEvent,
                        FAssetAddedEvent);
  virtual FassetAddedEvent& OnAssetAdded() override { return AssetAddedEvent; }
}
Note that a derived class does not automatically have permission to access a base class’ event members. If that is desired, it must be exposed explicitly through a function on the base class that invokes the broadcast.
Timers
Timers can be used to schedule actions to be performed at a specified delay, such as applying a power-up perk some time after picking it up, or applying a damage-per-second.
Note that currently timers are not thread-safe, and will assert if accessed outside of the game thread.
Timers are managed by a FTimerManager. Each World has a timer manager, and so does each Game Instance object (known as the global timer manager). The World’s global timer manager can be accessed through the AActor::GetWorldTimerManager function, which itself calls UWorld::GetTimerManager. The Game Instance’s global timer manager can be accessed through UGameInstance::GetTimerManager. If the World doesn’t have its own timer manager, the Game Instance’s is used instead. The global timer manager should be used for function calls that aren’t specific to any particular World.
Timers automatically cancel if the object which they would be called on is destroyed.
The SetTimer function has various overloads for registering a timer to fire, which can be attached to any type of object or function delegate, including native function pointers and IFunction objects. A timed function can be made to repeat at regular intervals.
Those functions create an FTimerHandle which can be used to pause and resume a countdown, query or change the time remaining, or even cancel the timer. It is safe to set timers within a timed function, or even to reuse the timer handle associated with the timed function.
The FTimerManager::ClearTimer function takes a timer handle to clear. Calling SetTimer with a valid, existing timer handle clears that timer handle before overwriting it.
Similarly, calling SetTimer with a rate of zero or less causes the timer handle to clear.
All timers associated with a particular object can be cleared at once with the FTimerManager::ClearAllTimersForObject function.
The SetTimerForNextTick function can be used to have a timer run on the next frame rather than on a time interval. This function does not create an FTimerHandle.
The FTimerManager::PauseTimer function pauses the timer associated with the given timer handle.
Smart Pointers
Unreal Engine has its own implementation of a variety of smart pointers.
Note that shared pointers are not compatible with Unreal UObjects.
The TSharedPtr type is a reference-counted shared pointer similar to std::shared_ptr.
// Create an empty shared pointer
TSharedPtr<FTreeNode> EmptyNode;

// Create a shared pointer to a new object
TSharedPtr<FTreeNode> Node(new FTreeNode());
The TSharedRef type is a non-nullable, reference counted smart pointer. This is made possible by the fact that it’s not possible to create an empty shared reference, nor is it possible to assign nullptr to a shared reference. Their non-nullable property obviates the need for the IsValid function present in TSharedPtr. The best practice is to use shared references when possible.
There are implicit conversions defined for shared references to shared pointers.
Converting from a shared pointer to a shared reference is potentially unsafe since the shared pointer may be empty, so the TSharedPtr::ToSharedRef function asserts if the pointer is null.
TSharedRef<FTreeNode> NodeRef(new FTreeNode());
The TWeakPtr type is a weak pointer, which is automatically emptied when the object is destroyed. The referenced object is only accessible by promoting the weak pointer to a shared pointer.
// Allocate a new tree node.
TSharedRef<FTreeNode> NodeOwner(new FTreeNode());

// Create a weak pointer to the new tree node.
TWeakPtr<FTreenode> NodeObserver(NodeOwner);

// Get access to the node through the weak pointer.
TSharedPtr<TFreeNode> LockedObserver(NodeObserver.Pin());

// Check that the shared reference was successfully created from the weak reference.
if (LockedObserver.IsValid())
{
  // Object still exists, so it can be accessed.
  LockedObserver->ListChildren();
}
The TSharedFromthis helper class can be derived to enable the acquisition of this as a TSharedRef, equivalent to std::enable_shared_from_this.
class FAnimation : public TSharedFromThis<FMyClass>
{
  void Register()
  {
    // Access a shared reference to 'this'
    TSharedRef<FMyClass> SharedThis = AsSharedRef();

    // Class a function that is expecting a shared reference
    AnimationSystem::RegisterAnimation(SharedThis);
  }
}
The MakeShareable function can be used to initialize shared pointers, equivalent to std::make_shared.
There are shared pointer cast functions StaticCastSharedPtr, ConstCastSharedPtr, DynamicCastSharedPtr, and corresponding variants for references with Ref suffixes, which are equivalent to the std::shared_ptr cast functions. In particular, the StaticCast* variants can be used to downcast a pointer to a derived class.
The performance characteristics of shared pointers are that they are generally fast, but they are not well-suited for engine or rendering hot paths.
There are thread-safe variants of the pointer types which use atomic reference counting, like std::shared_ptr does:
TThreadSafeSharedPtr<T>TThreadSafeSharedRef<T>TThreadSafeWeakPtr<T>TThreadSafeSharedFromThis<T>
TSubclassOf
the TSubclassOf type can be used to encode and enforce a reference to a type that is derived from a given type. This provides better guarantees than simply using a broad UClass pointer and hoping that the user provides an object of the appropriate kind.
// Too broad and dangerous.
UPROPERTY(EditDefaultsOnly, Category=Damage)
UClass* DamageType;

// Statically encoded and checked.
UPROPERTY(EditDefaultsOnly, Category=Damage)
TSubclassOf<UDamageType> DamageType;
Specifically, assigning a TSubclassOf to another where the type parameter of the right-hand side is a subclass of the left-hand side is statically enforced.
However, assigning a general UClass pointer to a TSubclassOf results in a run-time check, which results in a nullptr if the check fails.
TSubclassOf<UDamageType> damageType;
TSubclassOf<UDamageType_Lava> lavaDamage;

// Performs a compile time check
damageType = lavaDamage;

UClass* generalDamage = UDamageType::StaticClass();

// Performs a runtime check
damageType = generalDamage;
using TSubclassOf also restricts the choices available in the Editor to those that are subclasses of the specified type.
Strings
All strings in Unreal Engine are stored in memory as UTF-16 in FStrings or TCHAR arrays.
It’s recommended to put string literals in INT files instead of in the source code.
The FName type represents an interned, immutable string. Equality checks between two FNames simply compares their index into the intern table. The FName::Compare function can be used to compare the actual strings. Membership in the intern table can be tested by using an FName constructor overload.
FName TestHUDName = FName(TEXT("ThisIsMyTestFName"));

if (FName(TEXT("needle"), FNAME_Find) != NAME_None) {
  // Success. "needle" is in the intern table.
}
The FString type is the general, mutable string type. The FString::Printf function can be used to format FStrings. An FString can be dereferenced to access the raw underlying string.
FString TestHUDString = FString(TEXT("This is my test FString."));
The FText type represents immutable text to display and has built-in support for localization. It’s more efficient for use when rendering because of its immutable nature, the engine is able to use the string’s address as a key for cache lookups.
For localization purposes, an FText needs to have a key set. The NSLOCTEXT macro can be used to construct an FText with an explicit namespace and key.
FText TestHUDText = NSLOCTEXT("My_Namespace", "My_Key", "My Text");
Similarly, the LOCTEXT macro can be used to construct an FText with an explicit key and implicit namespace as defined by LOCTEXT_NAMESPACE.
#define LOCTEXT_NAMESPACE "My_Namespace"

FText TestHUDText = LOCTEXT("My_Key", "My Text");

#undef LOCTEXT_NAMESPACE
Collections
Note that currently neither TMap nor TSet can be used as replicated members, nor can they be accessed by Blueprints. By extension, the garbage collector only traverses TArrays, not TMap or TSet.
TArray
A TArray can be populated with the Init function which creates n copies of the second argument.
Elements can be appended with Push/Add and Emplace, equivalent to std::vector::push_back and std::vector::emplace_back respectively.
The Append function can append all of the elements elements from another TArray or native array.
The AddUnique function conditionally appends an element if it’s not already present.
The Insert function can be used to insert an element at a particular index, shifting existing elements to the right.
The SetNum function can be used to explicitly set the length of the array, either truncating it or filling in default elements.
The CreateIterator and CreateConstIterator functions can be used to explicitly construct an iterator.
C++’s ranged for can be used to iterate over a TArray.
FString JoinedStr;

for (auto& Str : StrArr)
{
  JoinedStr += Str;
  JoinedStr += TEXT(" ");
}
The Sort function sorts the TArray in an unstable manner, based on operator<, while an overload takes a lambda that defines the comparison function that determines if the first parameter is less than the second.
The array’s size is obtained with the Num function.
A raw pointer to the underlying array can be obtained with the GetData function.
TArray overloads the subscript operator to facilitate direct indexing.
The Last function makes it possible to index from the end of the array, with the parameter defaulted to 0 so that the last element is obtained.
The Top function is equivalent to Last() which is equivalent to Last(0).
The Contains function can be used to test for membership.
The ContainsByPredicate function can be used to test if any element in the array satisfies the predicate.
The Find function can be used to find the index of the first element that matches the given parameter. The FindLast function is similar but starts from the end of the array. Both functions return a bool indicating if an element was found, and if so, its position’s index is written to the output parameter. Overloads exist which instead return the index itself and don’t take the second parameter (to write the index to). If no element was found, the returned value is equal to INDEX_NONE.
The IndexOfByKey function is similar to Find except that the passed value isn’t converted to the type of the array element, instead it’s passed as the second argument to the array element type’s operator==.
the FindByKey function is similar to IndexOfByKey but returns a pointer to the found element, or nullptr if none is found.
The IndexOfByPredicate function finds the first element that satisfies the given predicate, returning INDEX_NONE if none is found.
the FindByPredicate function is similar to IndexOfByPredicate but returns a pointer to the found element, or nullptr if none is found.
The FilterByPredicate function produces a copy of the array with its elements filtered by the given predicate.
The Remove function removes all elements in the array equal to the argument, whereas the RemoveSingle function removes only the first match.
The RemoveAll function removes an element by predicate.
The RemoveAt function removes an element at the specified index.
When elements are removed, elements beyond them are shifted to the left to fill the hole left by the removed element. the RemoveSwap, RemoveAtSwap, and RemoveAllSwap variants can be used to skip this overhead by simply swapping the last element into the hole’s position.
the Pop function removes the final element.
The Empty function removes all elements from the array.
An array’s “slack” is Unreal Engine’s term for the difference between the maximum number of elements in an array and the current number of elements, i..e the amount of elements that can be added before needing to re-allocate.
The Empty and Reset functions take an optional slack requirement which ensures that the array have a slack of that size at a minimum. The Reset function in particular doesn’t free memory if the array already has a slack of that size or larger.
The Shrink function can be used to resize the array to free any memory from the slack region.
Arrays can be copied, which performs a deep copy.
Arrays can be concatenated with the operator+=.
The MoveTemp function can be used to mark a value for moving, similar to std::move.
An array is left empty when it’s moved.
Arrays can be tested for equality using the operator== and operator!=, which performs a pair-wise equality check on the elements.
The Heapify function can be used to structure the array as a heap using the element’s operator< to determine the lesser element, or an overload exists which takes a lambda. If such a predicate is provided, it must be passed to each heap operational function.
The HeapTop function can be used to return the top element of the heap.
The HeapPush and HeapPop functions can be used to push and pop onto the heap. The HeapPop function can write a copy of the removed top element to the output parameter reference, otherwise the HeapDiscard function can be used which simply removes the top element.
The AddUninitialized and InsertUninitialized add the specified number of appropriately-sized “slots” for the given element type. These slots can then be filled in with a memory copy or placement new.
// Memory copy.
int32 SrcInts[] = { 2, 3, 5, 7 };

TArray<int32> UninitInts;
UninitInts.AddUninitialized(4);

FMemory::Memcpy(UninitInts.GetData(), SrcInts, 4 * sizeof(int32));
// UninitInts == [2,3,5,7]

// Placement new.
TArray<FString> UninitStrs;

UninitStrs.Emplace(TEXT("A"));
UninitStrs.Emplace(TEXT("D"));

UninitStrs.InsertUninitialized(1, 2);

new ((void *)(UninitStrs.GetData() + 1)) FString(TEXT("B"));
new ((void *)(UninitStrs.GetData() + 2)) FString(TEXT("C"));
// UninitStrs == ["A","B","C","D"]
the AddZeroed and InsertZeroed functions are similar except that they also zero the memory region, which may be useful for certain types for which being zeroed is valid and expected.
The SetNumUninitialized and SetNumZeroed functions are similar to SetNum except that any new elements are left uninitialized or uninitialized and zeroed.
The BulkSerialize function can be used instead of operator<< to serialize an array as a raw memory copy instead of performing per-element serialization as with operator<<. This may benefit arrays of elements comprised of primitive types.
The Swap and SwapMemory functions can be used to swap the elements at two indices.
TMap
TMap is a hashed, associative container equivalent to std::unordered_map. There is also a TMultiMap equivalent to std::unordered_multimap. The key type must support the non-member GetTypeHash function and provide an operator== for comparing keys by equality. This can be customized via the final type parameter KeyFuncs.
the Add function is used to insert a key-value association. An overload exists that only takes the key, in which case it default-constructs the value.
There is also an equivalent Emplace function. Since it’s used to construct the map value type TPair, Emplace can only be used for key and value types with single-argument constructors, as Emplace wouldn’t otherwise know which parameters go to the key type constructor and which go to the value type constructor, for lack of something like std::piecewise_construct.
TMap<int32, FString> FruitMap;

FruitMap.Add(5, TEXT("Banana"));

// Default-construct the FString value.
FruitMap.Add(4);
The Append function inserts all elements from another TMap, with elements from the other map overwriting any pre-existing, clashing associations.
The Num function retrieves the number of contained elements.
The subscript operator is overloaded to facilitate access by key, yielding a reference to the value. This asserts if the key is missing.
The Contains function can be used to test membership by key.
The Find function returns a pointer to the value associated with the given key, or nullptr if none exists.
The FindOrAdd function is similar except that it if it doesn’t exist, it adds the association with a default-constructed value, and returns a reference to the value. Note that such references may become invalidated if a reallocation occurred since the time the reference was obtained.
The FindRef function does not return a reference, it returns a copy of the found value. If no such key exists, a default-constructed value is returned. The primary use of this is to unconditionally get a value for the given key without modifying the map.
The FindKey function can be used to reverse-lookup a key from a given value. This is a linear operation since the values aren’t hashed. Since values aren’t gauranteed to be unique, the returned key may be arbitrary.
The GenerateKeyArray and GenerateValueArray functions insert copies of all of the keys or values in the map into the passed TArray which is emptied before insertion.
The Remove function removes an association by key.
The FindAndRemove function removes an association and returns its value. It asserts if the association does not exist.
The RemoveAndCopyValue function is similar except that it returns the value via an output parameter and instaed returns a bool indicating whether or not the association existed, which by extension indicates whether the written value is valid.
The Empty function empties the entire map. It takes an optional slack value to reserve a certain amount of space.
As with TArray, TMap can be iterated with a ranged-for loop, and the key and value can be accessed via Key and Value properties. It’s also possible to explicitly construct an iterator via CreateIterator or CreateConstIterator, each of which have Key() and Value() accessor functions.
for (auto& Elem : FruitMap)
{
  FPlatformMisc::LocalPrint(
    *FString::Printf(TEXT("(%d, \"%s\")\n"), Elem.Key, *Elem.Value)
  );
}

for (auto It = FruitMap.CreateConstIterator(); It; ++It)
{
  FPlatformMisc::LocalPrint(
    *FString::Printf(TEXT("(%d, \"%s\")\n"),
      It.Key(),   // same as It->Key
      *It.Value() // same as *It->Value
    )
  );
}
It’s possible to sort a map so that it appears sorted for the next iteration by using the KeySort or ValueSort functions, which sort based on a provided lambda.
the Shrink function removes any holes at the end of the internal structure. The Compact function removes interior holes.
Any type with an overloaded operator== and overloaded GetTypeHash can be used as the KeyType in a TMap.
A custom KeyFuncs type can be passed to avoid the need to overload those functions. It can inherit from BaseKeyFuncs which defines certain types such as KeyInitType and ElementInitType.
A KeyFuncs type requires the definition of two types and three static functions.
Types:
KeyInitType: to pass the keys around, e.g. value orconstreferenceElementInitType: to pass elements around, e.g. value orconstreference of aTPair
Functions:
-
KeyInitType GetSetKey(ElementInitType Element)returns the element’s key
-
bool Matches(KeyInitType A, KeyInitType B)checks if keys A and B are equivalent
-
uint32 GetKeyHash(KeyInitType Key)computes key’s hash
Here’s an example implementation for a hypothetitcal type FMyStruct which has a UniqueID field which will be used for the key functionality. This type can then be passed as the fourth type parameter to TMap, after the allocator type (e.g. FDefaultSetAllocator).
template <typename ValueType>
struct TMyStructMapKeyFuncs :
  BaseKeyFuncs<
    TPair<FMyStruct, ValueType>,
    FString
  >
{
private:
  typedef BaseKeyFuncs<
    TPair<FMyStruct, ValueType>,
    FString
  > Super;

public:
  typedef typename Super::ElementInitType ElementInitType;
  typedef typename Super::KeyInitType     KeyInitType;

  static KeyInitType GetSetKey(ElementInitType Element)
  {
    return Element.Key.UniqueID;
  }

  static bool Matches(KeyInitType A, KeyInitType B)
  {
    return A.Compare(B, ESearchCase::CaseSensitive) == 0;
  }

  static uint32 GetKeyHash(KeyInitType Key)
  {
    return FCrc::StrCrc32(*Key);
  }
};
TSet
TSet is a set data structure similar to std::unordered_set. As with TMap, a custom KeyFuncs structure can be passed. It’s possible to permit duplicates, similar to std::unordered_multiset..
The Add and Emplace functions adds an element to the set.
The Append function adds all of the elements from another set.
Sets can be iterated with a ranged-for loop or by explicitly constructing an iterator with the CreateIterator or CreateConstIterator functions.
The Num function returns the number of contained elements.
the Index function returns the index of the given value as an FSetElementId type, or INDEX_NONE if it doesn’t exist. This index can bhen be used to explicitly index into the set using the subscript operator.
FSetElementId BananaIndex = FruitSet.Index(TEXT("Banana"));

if (BananaIndex != INDEX_NONE)
{
  FPlatformMisc::LocalPrint(*FruitSet[BananaIndex]);
}
The Contains function tests for membership.
The Find function finds an element and returns a pointer to it or nullptr if it doesn’t exist.
The Array function inserts a copy of each element in the set into the output parameter TArray, emptying it before insertion.
The Remove function removes an element by index or by key for all matching keys, and returns the number of elements removed. Removing by index is primarily useful while iterating through elements.
The Empty function empties the container and accepts an optional slack parameter which instructs it to reserve a minimum slack of the specified sizei after emptying the set. The Reset function is similar but doesn’t free memory previously used by elements.
The Reserve function preallocates a slack prior to element insertion.
As with TMap, the Shrink function only removes holes at the end of the internal structure. The Compact function can be used to remove interior holes. The CompactStable function is similar but stable.
As with TMap, a set can be sorted for the next iteration with the Sort function, which takes a sort-order function.
Blueprints
Blueprints are a visual programming tool. Each Blueprint has a Construction Script which is analogous to a class constructor: it is run when the object is created.
Blueprint Primitives
A reroute node is used to steer paths of blueprint graph edges.
Macros are mainly used to group simple, frequently used instructions. Unlike functions, macros are inlined.
A variable is created for each component included in a blueprint which points to that component.
Event dispatchers allow the binding of one event to another.
The Spawn Actor From Class node can be used to spawn an actor of a specified class. One can specify the transform to use upon spawning, how it should handle collision when spawning within another object, and a reference to an instigator: a pawn responsible for damage caused by the spawned actor.
Blueprint Compilation
Blueprints are compiled into UnrealScript VM bytecode before they can be used in-game.
FKismetCompilerContext is the class that compiles the Blueprint. It stores a reference to the class being compiled.
FKismetFunctionContext stores information for compiling a single function, such as a reference to the associated graph, its properties, and generated UFunction.
FNodeHandlingFunctor processs one class of node in the compiler (a singleton). Handles registering pin connections and generating compiled statements.
FKismetCompiledStatement represents a unit of work in the compiler. The compiler translates nodes into a set of compiled statements which the backend translates into bytecode. Examples of compiled statements include Goto, Call, etc.
FKismetTerm represents a terminal node in the graph, such as a literal value, const, or variable reference. Each data pin connection is associated with an FKismetTerm.
The compilation process is as follows:
-
Clean the class.
The same
UBlueprintGeneratedClassis cleaned and reused for each compilation. -
Create Class Properties
Find all
UPropertiesneeded by the class and create them on theUClass’ scope. -
Create Function List
Create the function list for the class by processing the event graphs, regular function graphs, and then pre-compiling the functions.
Processing the event graphs involves copying and merging all event graphs into a single graph, expanding its nodes, then creating function stubs for each Event node. An
FKismetFunctionContextis created for each event graph.Processing the function graphs involves duplicating each graph to a temporary graph in order to expand the nodes. An
FKismetFunctionContextis created for each function graph.Pre-compiling functions involves:
- scheduling execution and calculating data dependencies
- pruning nodes that are unscheduled or not data dependencies
- generating
FKismetTermsfor values in the function - creating the
UFunctionand any associated properties
-
Bind and Link the Class
The class is bound and linked now that all
UPropertys andUFunctions are known. This essentially produces a class header and the Class Default Object. -
Compile Functions
Generates
FKismetCompiledStatementobjects for the remaining nodes.This only occurs during a Full Compile.
-
Finish Compiling Class
Finalizes the class flags and propagates flags and metadata from the parent class.
-
Backend Emits Generated Code
Converts the statements from each function context into code using either of two backends:
FKismetCompilerVMBackendwhich generates UnrealScript VM bytecode which are then serialized into the function’s script arrayFKismetCppBackendwhich generates C++-like code for debugging purposes only
This only occurs during a Full Compile.
-
Copy Class Default Object Properties
Copies the values from the old CDO of the class into the new CDO. Components of the CDO are re-instanced and fixed-up.
-
Re-instance
All objects are re-instanced with the newly compiled class since the class may have changed size and properties may have been added or removed.
Blueprints versus Native Code
Epic says that it’s common for them to use Blueprints extensively and then profile and optimize by collapsing certian nodes into native C++.
Some things are better expressed in C++ than Blueprints, so complexity may be a deciding factor.
Some examples of divisions of labor include:
- C++
Characterclass with custom events, which is extended to Blueprints assign meshes and set defaults - C++ base
Turretclass that is extended in Blueprints into concrete classes such asArrowTurret - C++
Pickupclass withBlueprintImplementableEventfunctionsCollectandRespawnwhich are overridden in Blueprints to spawn different particle emitters and sound effects
Blueprint Nativization
Blueprint nativization generates C++ from the Blueprint Classes.
Inclusive nativization nativizes all supported Blueprint classes, which can greatly increase the executable’s size.
Exclusive nativization allows the explicit specification of which Blueprint classes should be nativized.
Blueprint Best Practices
Favor multiple output parameters over returning structs.
Adding new parameters is acceptable, but avoid removing or changing parameters. Instead deprecate the old function and create a new one.
Consider using the ExpandEnumAsExecs function specifier to make it easier to work with enumeration parameters.
Functions that take time to complete (e.g. a move order) should be marked with the Latent and Duration function specifiers. This also requires passing an FLatentActionInfo parameter.
Functions can be put into a shared library to make them usable from multiple classes, obviating the “Target” blueprint pin.
Blueprint Function Libraries
Shared utility static C++ functions that don’t belong to any particular gameplay object type can be exposed to Blueprints through Blueprint Function Libraries, which are created by defining a class that derives from UBluePrintFunctionLibrary.
Blueprint Function Libraries can be useful for collapsing multiple Blueprint nodes into a single C++ node, yielding greater performance and reducing complexity.
See this example from AnalyticsBlueprintLibrary.h.
UCLASS()
class UAnalyticsBlueprintLibrary :
  public UBlueprintFunctionLibrary
{
  GENERATED_BODY()

  // Starts an analytics session without any custom attributes specified.
  UFUNCTION(BlueprintCallable, Category="Analytics")
  static bool StartSession();
}

bool UAnalyticsBlueprintLibrary::StartSession()
{
  TSharedPtr<IAnalyticsProvider> Provider = FAnalytics::Get().GetDefaultConfiguredProvider();

  if (Provider.IsValid())
  {
    return Provider->StartSession();
  }
  else
  {
    UE_LOG(LogAnalyticsBPLib,
           Warning,
           TEXT("StartSession: Failed to get the default analytics provider. ")
           TEXT("Double check your [Analytics] configuration in your INI"));
  }

  return false;
}
Assertions
Unreal Engine provides assertion macros that are elided for release builds. Three categories of assertions exist: halting, halting in debug builds, and error-reporting without halting.
Halting Assertions
The check() macro evaluates the expression if DO_CHECK is defined and halts execution if it yields false.
The checkf(expr, …) is similar but takes a formatted string and its parameters.
checkf(WasDestroyed, TEXT("Failed to destroy Actor %s (%s)"),
                     *Actor->GetClass()->GetName(),
                     *Actor->GetActorLabel());
The verify() macro is similar to check() except that it evaluates the expression even if DO_CHECK is undefined, though no halting occurs.
There is also a verifyf(expr, …) variant.
There is a checkCode() variant that wraps the argument in a do-while loop in order to support multi-statement arguments.
The checkNoEntry() macro asserts that it is never reached, similar to Rust’s unreachable! macro.
The checkNoReentry() macro asserts that a function completes before being called again.
The checkNoRecursion() macro is a synonym of checkNoReentry().
The unimplemented() macro ensures that a function should not be overridden or called on on a specific class because it’s not implemented.
Debug Halting Assertions
This class of assertions only evaluate their expressions when DO_GUARD_SLOW is defined, which is usually only the case in debug builds. These assertions are appropriate for slower and more pedantic checks that aren’t really necessary in release builds.
The macros are variants of their non-slow counterparts and simply take on a Slow suffix:
checkSlow()checkfSlow()verifySlow()
Call-Stack Assertions
This category of assertions don’t halt execution but instead construct a call-stack if the expression evaluates to false. The expressions are always evaluated, but the call-stacks are only generated when DO_CHECK is defined.
The ensure() macro generates the call-stack for that location if the expression fails. If running in debug mode, it’ll trigger a breakpoint at that location when the expression fails, but it will do so only once and subsequent failures will simply evaluate to false. To trigger a breakpoint every time, use ensureAlways().
The ensureMsg() macro is similar to ensure() but additionally takes a string message to display as part of the call-stack.
The ensureMsgf() macro is simlar to ensureMsg() but also takes string formatting parameters.
If some C++ code was optimized preventing the breakpoint from being triggered, try running the Debug Editor profile.
Logging
To see logs, the game must be run with the -Log argument or the console command showlog must be run. When run in the editor, the logs are enabled by default due to the argument being set in GameCommandLine in the Engine configuration file, and they will be visible in the Output Log window.
Text can be logged with the UE_LOG macro. The macro takes a category, verbosity level, and the actual text. For example:
UE_LOG(LogTemp, Warning, TEXT("The message"));
The verbosity levels are:
Fatal: Always appear in console and log files even if logging is disabled.Error: Red. Appear in console and log files.Warning: Yellow. Appear in console and log files.Display: Appear in console and log files.Log: Appear in log files.Verbose: Appear in log files. Used for detailed logging and debugging.VeryVerbose: Appear in log files. Used for very detailed logging (like trace)
A log category can be declared with the DECLARE_LOG_CATEGORY_EXTERN macro. It takes the category name, its default verbosity, and the compile-time verbosity. The default verbosity sets the threshold past which no logging occurs. The compile-time verbosity sets the threshold past which the logging macro doesn’t compile into code.
DECLARE_LOG_CATEGORY_EXTERN(CategoryName, DefaultVerbosity, CompileTimeVerbosity);
The log category should then be defined in the implementation file with the DEFINE_LOG_CATEGORY macro.
DEFINE_LOG_CATEGORY(CategoryName);
The UE_LOG takes variable arguments that can be used for formatting the log message 2.
UE_LOG(MyLog, Warning, TEXT("MyCharacter's Name is %s"), *(MyCharacter->GetName()));
More directly, a message can be displayed on the screen with the UEngine::AddOnScreenDebugMessage method. It takes a unique key (to prevent duplicates; -1 for a transient message), its display duration in seconds, the color to use, and the message as an FString.
#include <EngineGlobals.h>
#include <Runtime/Engine/Classes/Engine/Engine.h>

FString message = FString::Printf(TEXT("Some variable values: x: %f, y: %f"), x, y);

GEngine->AddOnScreenDebugMessage(-1, 5.f, FColor::Red, message);
It’s also possible to log a message directly to the console through APlayerController::ClientMessage.
Assets
Referencing ASsets
A hard asset reference is one that directly refers to the reference, causing it to load whenever the referrer is loaded. A sort reference is an indirect reference by way of, for example, a string path to the object.
A direct property asset reference is made by exposing the property via UPROPERTYand then associating it via Blueprint inheritance or an instance placed in the world.
A construction-time asset reference is one that is explicitly “hard-coded” during the object’s construction through the use of ConstructionHelpers, which finds objects and classes.
UPROPERTY()
class UTexture2D* BarFillTexture;

…

AStrategyHUD::AStrategyHUD(const FObjectInitializer& ObjectInitializer)
    : Super(ObjectInitializer)
{
    static ConstructorHelpers::FObjectFinder<UTexture2D> BarFillObj(TEXT("/Game/UI/HUD/BarFill"));

    …

    BarFillTexture = BarFillObj.Object;

    …
}
Both directy property references and construction-time references are hard references, which means that the references are loaded when the referrers are loaded. This can end up increasing the memory footprint even if the references aren’t immediately needed.
The TSoftObjectPtr type can be used to represent a soft reference to an asset. It stores a string path to the reference and methods to query its loaded status. The reference must be explicitly loaded using the synchronous functions LoadObject<T> or StaticLoadObject, or asynchronous FStreamingManager.
There is also a TSoftClassPtr type variant that works the same way.
UPROPERTY(EditDefaultsOnly, BlueprintReadWrite, Category=Building)
TSoftObjectPtr<UStaticMesh> BaseMesh;

UStaticMesh *GetLazyLoadedMesh()
{
  // If it hasn't been loaded, force-load it synchronously with
  // FStreamingManager.
  if (BaseMesh.IsPending())
  {
    const FSoftObjectPath& AssetRef = BaseMesh.ToStringReference();
    BaseMesh = Cast<UStaticMesh>(Streamable.SynchronousLoad(AssetRef));
  }

  // Return internal pointer.
  return BaseMesh.Get();
}
The FSoftObjectPath struct contains a string with the full name of an asset. In the editor it shows up as a UObject pointer property. It handles cooking and redirects.
The TSoftObjectPtr templated type is essentially a TWeakObjectPtr to an FSoftObjectPath which restricts the specific class of object that is referred. If the class is already loaded, the Get function will return it, otherwise the ToSoftObjectPath function can be used to retrieve the path to it so it can be loaded explicitly.
It’s also possible to find or load objects by a string path.
Given a string path to an already-loaded object, a pointer to it can be found with the FindObject<T> function.
AFunctionalTest* TestToRun = FindObject<AFunctionalTest>(TestsOuter, *TestName);
Given a string path, it’s possible to load an object and obtain a pointer to it with the LoadObject<T> function.
GridTexture = LoadObject<UTexture2D>(
    NULL,
    TEXT("/Engine/EngineMaterials/DefaultWhiteGrid.DefaultWhiteGrid"),
    NULL,
    LOAD_None,
    NULL);
There is also a LoadClass<T> variant which is essentially equivalent to loading it with LoadObject and verifying its UClass.
DefaultPreviewPawnClass = LoadClass<APawn>(NULL, *PreviewPawnName, NULL, LOAD_None, NULL);

// Equivalent
DefaultPreviewPawnClass = LoadObject<UClass>(NULL, *PreviewPawnName, NULL, LOAD_None, NULL);

if (!DefaultPreviewPawnClass->IsA(APawn::StaticClass()))
{
    DefaultPreviewPawnClass = nullptr;
}
Asset Registry
The asset registry stores metadata about assets and allows searching and querying those assets. The Editor uses it to display information in the Content Browser.
A property must be amrked with the AssetRegistrySearchable property specifier in order to make it searchable through the asset registry.
Asset registry queries return objects of type FAssetData which contains information about the object, including:
ObjectPathin the formPackage.GroupNames.AssetNamePackageNameof the package containing the assetPackagePathof the package containing the assetGroupNamescontaining the asset, comma delimitedAssetNamewithout package or groupsAssetClass, itsUClassTMap<FName, FString> TagsAndValuesmap of properties that were markedAssetRegistrySearchable
There are functions that can retrieve lists of assets based on certain properties, such as GetAssetsByPackageName or the more general GetAllAssets.
The GetAsset function can be used to load the asset (if it isn’t already) and return it.
An ObjectLibrary contains a list of loaded objects or FAssetData objects for unloaded objects. This can be used to designate a directory as an asset source instead of having to manually maintain a master list.
// Create the ObjectLibrary if it doesn't already exist.
if (!ObjectLibrary)
{
  ObjectLibrary = UObjectLibrary::CreateLibrary(BaseClass, false, GIsEditor);
  ObjectLibrary->AddToRoot();
}

// Get asset information from assets at this path.
ObjectLibrary->LoadAssetDataFromPath(TEXT("/Game/PathWithAllObjectsOfSameType");

// Optionally load all of the assets.
if (bFullyLoad)
{
  ObjectLibrary->LoadAssetsFromAssetData();
}
The assets known to the ObjectLibrary can then be queried.
TArray<FAssetData> AssetDatas;
ObjectLibrary->GetAssetDataList(AssetDatas);

// Find first asset with property `TypeName` containing "FooType"
for (int32 i = 0; i < AssetDatas.Num(); ++i)
{
  FAssetData& AssetData = AssetDatas[i];

  const FString* FoundTypeNameString = AssetData.TagsAndValues.Find(
    GET_MEMBER_NAME_CHECKED(UAssetObject, TypeName));

  if (FoundTypeNameString && FoundTypeNameString->Contains(TEXT("FooType")))
  {
    return AssetData;
  }
}
Another way to access the asset registry is through the FassetRegistryModule. For example, a list of all assets of a specific class can be obtained.
// Load the AssetRegistry module.
FAssetRegistryModule& AssetRegistryModule =
  FModuleManager::LoadModuleChecked<FAssetRegistryModule>("AssetRegistry");

const UClass* Class = UStaticMesh::StaticClass();

// Get the assets of type UStaticMesh and add them to the AssetData array.
TArray<FAssetData> AssetData;
AssetRegistryModule.Get().GetAssetsByClass(Class, AssetData);
Asset registries have delegates that can be registered for when assets are discovered and created, renamed, or removed, among other events.
The asset registry’s GetAssets function can take a filter of type FARFilter which is capable of filtering by multiple criteria including:
- PackageName
- PackagePath
- Collection
- Class
- Tag-Value pairs
An asset satisfies a filter if it satisfies all of the components. Each individual component can have more than one element, and the component passes if any element satisfies the filter 3.
FAssetRegistryModule& AssetRegistryModule =
  FModuleManager::LoadModuleChecked<FAssetRegistryModule>("AssetRegistry");

FARFilter Filter;
Filter.Classes.Add(UStaticMesh::StaticClass());
Filter.PackagePaths.Add("/Game/Meshes");

TArray<FAssetData> AssetData;
AssetRegistryModule.Get().GetAssets(Filter, AssetData);
The FAssetData type’s TagsAndValues field is a TMap of the asset’s property FNames to their FString stringified values.
Asynchronous Loading
The FStreamableManager type can be used to asynchronously load an asset from disk. The RequestAsyncLoad function asynchronously loads a group of assets and invokes a delegate on completion.
This can also be used to load FAssetData for assets by simply calling ToStringReference on the assets.
It’s a good idea to put an FStreamManager in a global singleton object which can be specified at GameSingletonClassName in DefaultEngine.ini.
Note that the FStreamableManager maintains hard references to the loaded assets until the delegate is called, to prevent them from being garbage collected, but it releases those references after the delegate completes.
void UGameCheatManager::GrantItems()
{
  TArray<FSoftObjectPath> ItemsToStream;
  FStreamableManager& Streamable = UGameGlobals::Get().StreamableManager;

  // ItemList is an editable TArray<TSoftObjectPtr<UGameItem>>
  // RequestAsyncLoad takes TArray<TSoftObjectPtr<T>>
  for(int32 i = 0; i < ItemList.Num(); ++i)
  {
    ItemsToStream.AddUnique(ItemList[i].ToStringReference());
  }

  // Asynchronously load ItemsToStream, then invoke OnItemsLoaded
  Streamable.RequestAsyncLoad(
    ItemsToStream,
    FStreamableDelegate::CreateUObject(this, &UGameCheatManager::OnItemsLoaded));
}

void UGameCheatManager::OnItemsLoaded()
{
  for(int32 i = 0; i < ItemList.Num(); ++i)
  {
    // Now the asset should be loaded, so TSoftObjectPtr should have
    // the actual pointer. This may not be the case if it failed to load.
    UGameItemData* ItemData = ItemList[i].Get();

    if(ItemData)
    {
      MyCharacter->GrantItem(ItemData);
    }
  }
}
Build Configurations
Build configuration names are comprised of two components: state and project.
The available configuration states are:
Debug: Contains debug symbols. Builds both the Engine and Game in withDebugconfiguration. Opening the editor build with Debug configuration requires the-debugflag.DebugGame: Builds optimized Engine, but Debug Engine. Ideal for only debugging game modules.Development: Equivalent toRelease. Enables Editor hot-reload.Shipping: Fully optimized build. Strips out console commands, statistics, and profiling tools.Test: Equivalent toShippingbut retains statistics, profiling tools, and certain console commands.
The available configuration targets are:
[empty]: Builds stand-alone executable. Requires platform-specific cooked content.Editor: Enables Editor hot-reload.Client: Designates project as being the Client in the client-server model. Enacts theClient.Target.cs build file.Server: Designates project as being the Server in the client-server model. Enacts theServer.Target.cs build file.
Console
There are console commands and console variables.
A console variable can be registered in any source file by defining a static variable wrapping the underlying type in TAutoConsoleVar<T>. It’s also possible to dynamically register a console variable with the IConsoleManager::RegisterConsoleVariable function.
It’s also possible to register a reference to a variable with RegisterConsoleVariableRef but it’s use is discouraged because it bypasses various important features.
static TAutoConsoleVariable<int32> CVarRefractionQuality(
  // Name
  TEXT("r.RefractionQuality"),

  // Default value
  2,

  // Documentation
  TEXT("Defines the distortion/refraction quality, adjust for quality or performance.\n")
  TEXT("<=0: off (fastest)\n")
  TEXT("  1: low quality (not yet implemented)\n")
  TEXT("  2: normal quality (default)\n")
  TEXT("  3: high quality (e.g. color fringe, not yet implemented)"),

  // Flags
  ECVF_Scalability | ECVF_RenderThreadSafe);
The state of a console variable can be retrieved by storing a pointer to the IConsoleVariable returned by the registration function or by using the IConsoleManager::FindConsoleVariable function to obtain a a pointer to the IConsoleVariable representing the console variable, then obtaining the underylng value with the GetInt function, for example. In the latter case, it’s safe to store the IConsoleVariable in a static variable because the variable will never move and only gets destroyed on engine shutdown.
static const auto CVar = IConsoleManager::Get().FindConsoleVariable(TEXT("TonemapperType"));

int32 Value = CVar->GetInt();
There are three ways to respond to variable changes.
The first is to store the old value and check on each frame if the current value differs.
The second is to register a console variable sink which is a callback function that is called whenever the console variable is changed by the user. Sinks are called at a specific point on the main thread before rendering. Multiple related changes should be coalesced into a single change by setting a flag, instead of depending on an undefined execution order.
static void MySinkFunction()
{
  bool bNewAtmosphere = CVarAtmosphereRender.GetValueOnGameThread() != 0;

  // Assume the state is true.
  static bool GAtmosphere = true;

  if (GAtmosphere != bNewAtmosphere)
  {
    GAtmosphere = bNewAtmosphere;

    // Handle change.
  }
}

FAutoConsoleVariableSink CMyVarSink(FConsoleCommandDelegate::CreateStatic(&MySinkFunction));
Finally, it’s possible to register a callback to fire when the variable changes. This is dangerous and discouraged compared to a sink because other console variables in the delegate can cause infinite loops.
void OnChangeResQuality(IConsoleVariable* Var)
{
  SetResQualityLevel(Var->GetInt());
}

CVarResQuality.AsVariable()
  ->SetOnChangedCallback(FConsoleVariableDelegate::CreateStatic(&OnChangeResQuality));
Developers can specify variable values to automatically load in Engine/Config/ConsoleVariables.ini, as well as in Engine/Config/BaseEngine.ini:
[SystemSettings]
r.MyCvar = 2

[SystemSettingsEditor]
r.MyCvar = 3
Console variables can also be set at start-up with the -ExecCmds program argument.
UE4Editor.exe GAMENAME -ExecCmds="r.BloomQuality 12;vis 21;Quit"
Packaging
When a project is packaged, its code is compiled, its content is cooked into the target platform’s format, then everything is bundled into a distributable set of files such as an installer. The Editor exposes this process through the File → Package Project menu option.
Cooking is the process of converting from an internal asset format to a platform-specific format.
A Game Default Map should be set which will load when the packaged game starts, which can be done through Edit → Project Settings → Maps & Modes.
Packaging the project prompts the user for an output directory, under which a sub-directory is created containing the packaged game.
Additional packaging settings can be set at Edit → Project Settings → Packaging.
For development, it’s possible to skip the packaging process and only cook the content for a particular target platform without packaging by using File → Cook Content → [Platform Name]. Note that this will litter the local developer workspace with the cooked content.
Loading times can be optimized through a variety of features.
The Asynchronous Loading Thread (ALT) feature, which is off by default, runs serialization and post-loading code concurrently on two separate threads, effectively doubling loading speed. The caveat is that UObject class constructors, PostInitProperties functions, and Serialize functions in the game must be thread-safe.
The Event-Driven Loader, which is on by default, also doubles loading speed.
Compressing .pak files can also decrease loading times with certain platforms as exceptions. Also note that on Steam, the trade-off is that the differential patching system works better with uncompressed assets. Compression can be enabled in the Packaging settings section.
The order of contents in the .pak files can affect load times. The Engine provides tools for determining what order the assets are required.
- Run the packaged game with the
-fileopenlogargument. - Exercise all major areas to cause the loading of as many assets as possible.
- Quit the game.
- Find the file GameOpenOrder.log which may be in Game/Build/WindowsNoEditor/FileOpenOrder/ and copy it to the development directory under /Build/WindowsNoEditor/FileOpenOrder/
- Rebuild the .pak file. This will build it according to the file order recorded in the log file.
The log file should be checked into source control and periodically updated, based on changes to assets.
Cooking
Cooking can be done through the command line. The -iterate option only builds whatever is out of date (without it, the output directory is deleted and everything is recooked). There is also a -cookonthefly option which starts a server which games (clients) can connect to with the -filehostip=<ip> argument so that the server cooks and serves content as it is needed by the client.
Patching
During patching, the engine compares all post-cook content to the originally released content to determine what is part of the patch. The smallest unit of content is a single package (.ulevel or .uasset), so that if anything within a package changes, the entire package is included in the patch. At run-time, both the original and the patch .pak files are loaded, with a higher priority given to the patch file so that content within it is loaded first. A higher priority can be specified via the file system by naming the .pak file with a _p suffix.
Automation System
The automation system facilitates automated testing.
- Unit Tests: API-level verification tests (e.g. TimespanTest.cpp)
- Feature Tests: System-level verification tests, such as verifying Play-In-Editor functions, correct in-game stats, changing of video resolution, etc. (e.g. EditorAutomationTests.cpp)
- Smoke Tests: Intended to be fast enough to run whenever the Editor, game, or commandlet starts.
- Content Stress Tests: Testing system to its limits to avoid crashes, such as loading all maps or compiling all Blueprints. (e.g. EditorAutomationTests.cpp)
- Screenshot Comparison: Compare screenshots to detect rendering issues/disparities.
Automation Tests
Automation tests are declared with macros and implemented by overriding functions from FAutomationTestBase.
There are two types of tests: simple and complex, declared with IMPLEMENT_SIMPLE_AUTOMATION_TEST and IMPLEMENT_COMPLEX_AUTOMATION_TEST, respectively. Both macros take the following parameters:
TClass: The desired class name of the test.PrettyName: A string specifying a hierarchical, period.-delimited test name to appear int eh UI.TFlags: Combination ofEAutomationTestFlagsfor specifying test requirements and behaviors.
The following functions can be overridden.
RunTest: Performs the actual test, returningtrueif it passes.- Parameter -
Parameters: Can be parsed or passed-through to other functions.
- Parameter -
GetTests: Must be overridden for Complex Tests.- Parameter -
OutBeautifiedNames: Array of strings that must be populated with the UI-visiblePrettyNameof each Test - Parameter -
OutTestCommands: Parallel ofOutBeautifiedNamescontaining theParameterspassed toRunTest
- Parameter -
By convention, tests go into the Private/Tests directory of the relevant module. If the test is for a specific class, it should be named after the class with a Test suffix.
IMPLEMENT_SIMPLE_AUTOMATION_TEST(
  FPlaceholderTest,
  "TestGroup.TestSubgroup.Placeholder Test",
  EAutomationTestFlags::EditorContext | EAutomationTestFlags::EngineFilter)

bool FPlaceholderTest::RunTest(const FString& Parameters)
{
  return true;
}
Simple tests are appropriate for unit or feature tests. This example tests the SetRes command.
IMPLEMENT_SIMPLE_AUTOMATION_TEST(FSetResTest, "Windows.SetResolution", ATF_Game);

bool FSetResTest::RunTest(const FString& Parameters)
{
  FString MapName = TEXT("AutomationTest");
  FEngineAutomationTestUtilities::LoadMap(MapName);

  int32 ResX = GSystemSettings.ResX;
  int32 ResY = GSystemSettings.ResY;
  FString RestoreResolutionString = FString::Printf(TEXT("setres %dx%d"), ResX, ResY);

  ADD_LATENT_AUTOMATION_COMMAND(FEngineWaitLatentCommand(2.0f));
  ADD_LATENT_AUTOMATION_COMMAND(FExecStringLatentCommand(TEXT("setres 640x480")));
  ADD_LATENT_AUTOMATION_COMMAND(FEngineWaitLatentCommand(2.0f));
  ADD_LATENT_AUTOMATION_COMMAND(FExecStringLatentCommand(RestoreResolutionString));

  return true;
}
Complex tests can run the same test on a range of inputs, and are usually appropriate for stress tests, such as loading all maps or compiling all Blueprints. This example loads all of the project’s maps.
IMPLEMENT_COMPLEX_AUTOMATION_TEST(FLoadAllMapsInGameTest, "Maps.LoadAllInGame", ATF_Game)

void FLoadAllMapsInGameTest::GetTests(TArray<FString>& OutBeautifiedNames,
                                      TArray <FString>& OutTestCommands) const
{
  FEngineAutomationTestUtilities Utils;
  TArray<FString> FileList = GPackageFileCache->GetPackageFileList();

  // Iterate over all files, adding the ones with the map extension..
  for (int32 FileIndex = 0; FileIndex< FileList.Num(); FileIndex++)
  {
    const FString& Filename = FileList[FileIndex];

    // Disregard filenames that don't have the map extension if we're in MAPSONLY mode.
    if (FPaths::GetExtension(Filename, true) == FPackageName::GetMapPackageExtension())
    {
      if (!Utils.ShouldExcludeDueToPath(Filename))
      {
        OutBeautifiedNames.Add(FPaths::GetBaseFilename(Filename));
        OutTestCommands.Add(Filename);
      }
    }
  }
}

bool FLoadAllMapsInGameTest::RunTest(const FString& Parameters)
{
  FString MapName = Parameters;

  FEngineAutomationTestUtilities::LoadMap(MapName);
  ADD_LATENT_AUTOMATION_COMMAND(FEnqueuePerformanceCaptureCommands());

  return true;
}
Latent commands can be queued during a RunTest to run across multiple frames. A Latent Action is defined with the DEFINE_LATENT_AUTOMATION_COMMAND macro, whose parameter is the CommandName to name the class that is created for the Latent Command. The class needs a definition for the Update function.
A Latent Command continues to execute until the Update command returns true, which is taken to mean that it is completed. A return value of false causes the Automation Test to stop executing immediately and try again next frame.
DEFINE_LATENT_AUTOMATION_COMMAND(FNUTWaitForUnitTests);

bool FNUTWaitForUnitTests::Update()
{
  return GUnitTestManager == NULL || !GUnitTestManager->IsRunningUnitTests();
}
The DEFINE_LATENT_AUTOMATION_COMMAND_ONE_PARAMETER macro allows specifying a parameter type and name that will be defined on the class and accessible in the Update method.
DEFINE_LATENT_AUTOMATION_COMMAND_ONE_PARAMETER(
  FConnectLatentCommand,
  SourceControlAutomationCommon::FAsyncCommandHelper,
  AsyncHelper);

bool FConnectLatentCommand::Update()
{
  // Attempt a login and wait for the result.
  if(!AsyncHelper.IsDispatched())
  {
    auto result = ISourceControlModule::Get().GetProvider().Login(
      FString(),
      EConcurrency::Asynchronous,
      FSourceControlOperationComplete::CreateRaw(
        &AsyncHelper,
        &SourceControlAutomationCommon::FAsyncCommandHelper::SourceControlOperationComplete))

    if(result != ECommandResult::Succeeded)
    {
      return false;
    }

    AsyncHelper.SetDispatched();
  }

  return AsyncHelper.IsDone();
}
A Latent Command is executed by invoking ADD_LATENT_AUTOMATION_COMMAND with the Latent Command’s constructor and parameter, if one was specified.
ADD_LATENT_AUTOMATION_COMMAND(FNUTWaitForUnitTests());
ADD_LATENT_AUTOMATION_COMMAND(FConnectLatentCommand(SourceControlAutomationCommon::FAsyncCommandHelper()));
Configuration
Classes with the Config class specifier can invoke the SaveConfig function To save any properties marked with the Config property specifier. Variables are generally saved in a section title with the [:package.:classname] format. The Config specifier requires a category parameter which determines the configuration file the properties are read from and written to.
The Config class specifier only indicates that the class can have variables read-in from configuration files, and which configuration file to read from. Specific properties must still be marked with the Config property specifier for that to actually occur. Both Config specifiers are inherited by child classes, except that their configuration section uses the child name.
If the PerObjectConfig class specifier is used, per-instance properties can be saved to a section named with the format [ObjectName ClassName].
The configuration categories are:
- Compat
- DeviceProfiles
- Editor
- EditorGameAgnostic
- EditorKeyBindings
- EditorUserSettings
- Engine
- Game
- Input
- Lightmass
- Scalability
The configuration files are read from the file system in a pre-defined order, with later, more specific files overriding values from earlier files. There are Engine-wide files that apply to all projects, project-specific files, and finally platform-specific, project-specific files.
- Engine/Config/Base.ini
- Engine/Config/BaseEngine.ini
- Engine/Config/[Platform]/[Platform]Engine.ini
- [ProjectDirectory]/Config/DefaultEngine.ini
- [ProjectDirectory]/Config/[Platform]Engine.ini
- [ProjectDirectory]/Saved/Config/[Platform]/Engine.ini
Configuration files support comments via a semicolon ;.
Configuration files support special line prefix characters.
-
+- adds the property if it doesn’t exist already (e.g. in the same file or a previous configuration) -
.- adds a new property, potentially duplicateThis is useful for bindings where the latest bind takes effect.
[/Script/Engine.PlayerInput]
Bindings=(Name="Q",Command="Foo")
.Bindings=(Name="Q",Command="Bar")
.Bindings=(Name="Q",Command="Foo")
-
-- removes a line. requires exact match -
!- removes a property by name. doesn’t require exact match
Play-In-Editor
By default, the SHIFT + F1 hotkey can be used to regain mouse control without stopping the simulation.
By default any values changed for Actors during a Play-In-Editor (PIE) session will be reverted when the session ends unless the Keep Simulation Changes option is used on the Actor (or K is pressed).
The Simulate-In-Editor function is similar to PIE except that it works even if there’s no playable character, and is useful for testing Actors that simulate physics.
The Play button has a drop-down to the right displaying various simulation styles and options. For example, it’s possible to specify the number of players for a multi-player game, so that the Server will use the selected viewport and new windows are created for each added player. The Advanced Options can be used to specify further options such as spawning a dedicated server.
Rendering
Each frame is rendered in FDeferredShadingSceneRenderer::Render. The rendering thread runs in parallel to the game thread. Certain classes bridge the gap.
UWorld: contains a collection of Actors and Components. Levels can be streamed in and out of the world. Multiple worlds can be active.ULevel: contains a collection of Actors and Components that are loaded and unloaded as a group and saved to a single map fileUSceneComponent: base class of any object in anFSceneUPrimitiveComponent: base class of anything that can be rendered or that can interact with physic. visibility culling is performed at the granularity level of aUPrimitiveComponent. The game thread owns all variables and state, so the render thread should not access it directly.ULightComponent: represents a light source that the renderer is responsible for computing and adding its light contribution to the sceneFScene: the renderer’s view of aUWorld. objects are only known to the renderer once they’re added to theFScene, which is known as registering a component. the render thread owns all of the state inFSceneand the game thread should not modify it directly.FPrimitiveSceneProxy: the renderer’s view ofUPrimitiveComponent. it’s intended to be derived to support different types of primitives such as skeletal, rigid, and BSP. AnFPrimitiveSceneProxyis created once the correspondingUPrimitiveComponentis registeredFPrimitiveSceneInfo:the internal,FRendererModuleimplementation-specific renderer state that corresponds to aUPrimitiveComponentandFPrimitiveSceneProxyFSceneView: a single view into anFSceneby the engine. Multiple views can be rendered with separate calls toFSceneRenderer::Render, such as to support multiple editor viewports, or multiple views can be rendered simultaneously with the same call toFSceneRenderer::Render, such as to support split-screen.FSceneViewState: stores the renderer’s private information about a view that is needed across frames. oneFSceneViewStateperULocalPlayerFSceneRenderer: created each frame to encapsulate inter-frame temporaries
This table shows the primary classes and their analogs in the corresponding module.
| Engine | Renderer |
|---|---|
UWorld |
FScene |
UPrimitiveComponent and FPrimitiveSceneProxy |
FPrimitiveSceneInfo |
FSceneView |
FViewInfo |
ULocalPlayer |
FSceneViewState |
ULightComponent and FLightSceneProxy |
FLightSceneInfo |
This table shows what class owns the state of the thread they’re in.
| Game | Renderer |
|---|---|
UWorld |
FScene |
UPrimitiveComponent |
FPrimitiveSceneProxy / FPrimitiveSceneInfo |
FSceneView / FViewInfo |
|
ULocalPlayer |
FSceneViewState |
ULightComponent |
FLightSceneProxy / FLightSceneInfo |
Primitive components are the basic unit of visibility and relevance determination, as determined by the component’s bounds, which are used for culling, shadow casting, light influence determination, etc. For this reason, a component’s size should be considered carefully.
Components only become visible once they’re registered, and any further changes to the component’s properties must be “flushed” to the render thread by calling MarkRenderStateDirty() on the component.
The FPrimitiveSceneProxy::GetViewRelevance() method is called from InitViews at the beginning of each frame to return a populated FPrimitiveViewRelevance.
The FPrimitiveSceneProxy::DrawDynamicElements method is called to draw the proxy in any passes in which it is relevant, if it indicated that it has dynamic relevance.
The FPrimitiveSceneProxy::DrawStaticElements method is called to submit StaticMesh elements for the proxy when the primitive is being attached on the game thread, if it indicated that it has static relevance.
The FPrimitiveViewRelevance type contains the information on what effects (and their passes) are relevant to the primitive. Since a primitive may have multiple elements with different relevancies, the FPrimitiveViewRelevance is essentially a union of the relevancies of all of the elements. The FPrimitiveViewRelevance type also indicates if it uses the dynamic and/or static rendering paths via bStaticRelevance and bDynamicRelevance.
Draw policies render meshes with pass-specific shaders. The FVertexFactory interface abstracts the mesh type and the FMaterial interface abstracts the material details. A drawing policy takes a set of mesh material shaders and an FVertexFactor to apply them to, then binds the FVertexFactory’s buffers and the mesh material shaders to the Rendering Hardware Interface (RHI), sets the appropriate shader parameters, then issues the draw call.
Render Paths
The dynamic rendering path provides more control but is slower to traverse, while the static rendering path caches the scene traversal as close to the RHI level as possible. Each rendering pass (drawing policy) needs to be able to handle both rendering paths.
For the dynamic rendering path, the TDynamicPrimitiveDrawer is used. The FViewInfo::VisibleDynamicPrimitives method keeps track of and returns an array of visible dynamic primitives, then for each the rendering pass calls its DrawDynamicElements method, which then needs to assemble as many FMeshElements as it needs to then submit them with DrawRichMesh or TDynamicPrimitiveDrawer::DrawMesh, which creates a temporary drawing policy.
In the dynamic rendering path, each proxy has a callback in DrawDynamicElements where it can execute logic specific to that component type. Despite minimal insertion cost, it has high traversal cost because there is no state sorting and nothing is cached.
The static rendering path uses static draw lists, with meshes inserted into draw lists when they are attached to the scene. As each mesh is inserted, DrawStaticElements is called on the proxy to collect the FStaticMeshElements. A drawing policy instance is created and stored and sorted based on its Compare and Matches functions, then inserted into the appropriate place in the draw list. The InitViews function then initializes a bitarray with visibility data for the static draw list, then it’s passed to TStaticMeshDrawList::DrawVisible which actually draws the draw list. The DrawShared method is only called once for all drawing policies that match each other. The SetMeshRenderState and DrawMesh methods are called for each FStaticMeshElement.
Bugs may be exposed by the static rendering path since it only calls DrawShared once per state bucket, especially since it depends on the rendering and attach order of the meshes in the scene. The dynamic rendering path can be forced by using certain view modes like “lighting only,” which can be used to forcefully expose a static rendering bug in a drawing policy’s DrawShared and/or Matches method.
The static rendering path moves a lot of work to attach time, thereby speeding up traversal at render time. Only view-independent state is cached since it’s cached at attach time.
A high-level rendering order is:
-
GSceneRenderTargets.AllocateIf needed, reallocates the global scene render targets to fit the current view.
-
InitViewsUses various culling methods to initialize primitive visibility, sets up visible dynamic shadows, and intersects shadow frustrums with the world.
-
PrePassandFDepthDrawingPolicy(Depth-only pass)Renders occluders, outputting depth to the depth buffer. Can operate with occlusion only, complete depths, or disabled outright. The main purpose is to initialize Hierarchical Z to reduce shading cost of the base pass.
-
RenderBasePassandTBasePassDrawingPolicyRenders opaque and masked materials, outputting material attributes to the
GBuffer. Lightmap contribution and sky lighting is also computed and put in the scene color. -
Issue Occlusion Queries and
BeginOcclusionTestsStarts latent occlusion queries that are used in the next frame’s
InitViews. Occlusion queries are done by rendering bounding boxes around the objects being queried, sometimes merging bounding boxes to reduce draw calls. -
Lighting
Shadowmaps for each light are rendered and light contribution is accumulated to the scene color through a mix of standard and tiled deferred shading. Light is also accumulated in the translucency lighting volumes.
-
Fog
Fog and atmosphere are computed per-pixel for opaque surfaces in a deferred pass.
-
Translucency
Translucency is accumulated into an offscreen render target, and fog is applied to it per-vertex so it can integrate into the scene. Lit translucency computes final lighting in a single pass to blend correctly.
-
Post-Processing
Post-processing effects are applied using the
GBuffers and translucency is composited into the scene.
Render Hardware Interface
The Render Hardware Interface (RHI) is a thin wrapper around platform-specific graphics APIs, as low-level as possible. Feature sets are wrapped into ERHIFeatureLevels, so that if a platform cannot support an entire feature level, it must drop to the feature level that it can fully support.
| Feature Level | Description |
|---|---|
| SM5 | Corresponds to D3D11 Shader model 5 with a cap on 16 textures due to OpenGL 4.3 limits. Supports tessellation, compute shaders, cubemap arrays, and the deferred shading path. |
| SM4 | Corresponds to D3D11 Shader Model 4. Equivalent to Feature Level SM5 without tessellation, compute shaders, or cubemap arrays. |
| ES2 | Corresponds to OpenGL ES2 feature sets. Uses a pared down forward shading path. |
Render states are grouped based on the part of the pipeline that they affect, such as RHISetDepthState affecting all state relevant to depth buffering.
Unreal Engine has an implicit set of states that it assumes are set to the defaults. If they’re changed, they must be restored to the defaults. The following smaller set of states need to be set explicitly:
RHISetRenderTargetsRHISetBoundShaderStateRHISetDepthStateRHISetBlendStateRHISetRasterizerState- shader dependencies set by
RHISetBoundShaderState
The rest of the states are assumed to be set to their defaults, as determined by the corresponding TStatic*State, such as RHISetStencilState(TStaticStencilState<>::GetRHI()).
Simulation-Renderer Synchronization
Asynchronous communication between the game and render thread can be accomplished through the use of the ENQUEUE_UNIQUE_RENDER_COMMAND_*PARAMTER macro which creates a local class with an overridden Execute method. The class is pushed onto the rendering command queue and then invoked by the renderer when it is able to.
The FRenderCommandFence class can be used to synchronize with the render thread by having the game thread call its BeginFence method and then either synchronously waiting on it with Wait or poll progress via GetNumPendingFences.
Synchronous communication can be achieved with the FlushRenderingCommands method which blocks the game thread until the render thread has caught up, though its use is discouraged outside of offline operations..
Resources on the renderer thread can be represented by the FRenderResource base class. Anything deriving from it must be initialized before rendering and released before being deleted. Since its InitResource method can only be called from the rendering thread, the helper function BeginInitResource enqueues a rendering command which calls it (InitResource).
It is considered poor practice to combine update and render operations in DrawDynamicElements. This is because DrawDynamicElements is called at a high level by rendering code which assumes that no RHI state is being changed and that it may call DrawDynamicElements as many times as it needs to within each frame, or not at all due to the occlusion system, which would prevent the once-per-frame updating of the state.
Instead the update should be taken out of the render traversal by enqueuing a render command within the game thread’s Tick which performs the update operation, which the rendering command can optionally skip based on visibility or by using LastRenderTime. This allows any RHI functions to be used, including setting different render targets. An exception to this is stat caching, which stores the intermediate result of the rendering traversal as an optimization, and since it doesn’t change RHI state, it doesn’t suffer from the aforementioned pitfalls as long as cache determiniation is correct.
A USkeletalMesh static resource that is freed is handled by the renderer thread as follows:
USkeletalMesh::PostLoadinvokesInitResourceswhich invokesBeginInitResourcefor any staticFRenderResourcesit contains, which invokesFRenderResource::InitResourceon the render thread, after which the render thread takes ownership of the index buffer memory, so the game thread must not modify it unless it regains ownership- component registers, which starts rendering the
USkeletalMesh’s index buffer - GC deems it time to detach the component. The game thread cannot delete the index buffer memory becuase the rendering thread may still be rendering with it.
- GC invokes
USkeletalMesh::BeginDestroyas the last chance for the game thread to enqueue render commands to release rendering resources, i.e.BeginReleaseResource(&IndexBuffer). It’s still not safe for the game thread to delete the index buffer because the command may not have been processed by the render thread. - GC invokes
USkeletalMesh::IsReadyForFinishDestroyuntil it returnstrue, at which point the GC destroys theUObject.USkeletalMesh’s implementation would only returntrueonce the fence has been passed by the render thread, meaning it is safe for the game thread to delete the index buffer memory. - GC calls
UObject::FinishDestroyas the central location in which to release memory. ForUSkeletalMesh’s index buffer memory this is handled by its destructor callingFRawStaticIndexBuffer’s destructor callingTArray’s destructor.
A USkinnedMeshComponent dynamic resource that is freed is handled by the renderer thread as follows:
USkinnedMeshComponent::CreateRenderState_Concurrentallocates aUSkinnedMeshComponent::MeshObjectwhich the game thread can modify through a pointer instead of modifying theFSkeletalMeshObjectdirectly.USkinnedMeshComponent:UpdateTransformis called at least once per frame to update the component’s movement, which callsFSkeletalMeshObjectGPUSkin::Updatewhen doing GPU skinning to obtain updated transforms on the game thread. The updated transforms are communicated to the render thread by allocating heap memory withFDynamicSkelMeshObjectData, copying the bone transforms into it, then copying it to the render thread with theENQUEUE_UNIQUE_RENDER_COMMAND_TWOPARAMETERmacro which contains code to copy the transforms to their final destinations so that they may be set as shader constants. If updating vertex positions, the vertex buffer would be locked before being updated.- When the component gets detached, the game thread enqueues render commands to release all of the dyanmic
FRenderResourcesand sets theMeshObjectpointer tonullptr, although the actual memory is still referenced by the render thread and so cannot be deleted. Deletion is deferred by deriving from theFDeferredCleanupInterfaceclass and invokingBeginCleanup(MeshObject), which eventually frees the memory when it’s safe to do so.
Render Commands
There are some console commands that can help with profiling and debugging the rendering process.
stat unit: show overall frame time and game thread, rendering thread, and GPU times.recompileshaders changed(CTRL + SHIFT + .): recompile shaders taht changed based on.usffile. Happens automatically on load.profilegpu(CTRL + SHIFT + ;): GPU timings for the view being rendered. View results in UI popup or engine log.VisorVisualize Texture: visualizes the contents of render targetsshow x: toggles showflagspause: pause simulation but continue renderingslomo x: alter game speed. useful for slowing time without skipping simulation work when profilingdebugcreateplayer 1: testing splitscreen
Coordinate-Space Terminology
Unreal Engine’s convention is to name transformations as XToY, e.g. WorldToView.
Tangent Space is orthogonal. The TangentToLocal transform only contains rotation.
Local Space aka Object Space is orthogonal. The LocalToWorld transform contains rotation, non-uniform scaling (can also change winding order), and translation.
With World Space, the WorldToView transform only contains rotation and translation, so distances in View Space and World Space are equivalent.
With TranslatedWorld Space matrices are used to remove the camera position from concatenated transform matrices in order to improve precision when trasnforming vertices. The TranslatedWorld transform is equivalent to translating the World transform by the PreViewTranslation.
With the View Space aka CameraSpace, the ViewToClip transform contains x and y scale and no translation. This inherently scales and translates z and applies projection to convert into homogenous Clip Space.
Clip Space aka HomogenousCoordinates aka PostProjectionSpace aka ProjectionSpace represents the space after perspective projection has been applied. Remember that w in Clip space is equivalent to z in View Space.
Screen Space aka NormalizedDeviceCoordinates (in OpenGL) represents the space after the perspective divide, where left is -1, right is 1, top is 1, bottom is -1, near is 0, and far is 1.
Viewport space aka ViewportCoordinates aka WindowCoordinates is representative of the pixel resolution of the display, where left is 0, right is $\text{width} - 1$, top is 0, and bottom is $\text{height} - 1$.
Source vs Launcher
The source must be built in order to build a standalone dedicated server.
The engine can be added as a submodule of the game repository, in which case the .uproject’s EngineAssociation setting must be set to a relative path to that submodule:
For users which mount the engine through a Git submodule (where the engine is in a subdirectory of the project), this field can be manually edited to be a relative path.
It seems that Epic’s own internal workflow is to embed the game directly within the engine source tree.
Network Replication
Network replication code requires the UnrealNetwork.h header.
The frequency of an Actor’s replication is determined by the AActor::NetUpdateFrequency property, which specifies the maximum number of times per second that the Actor should attempt to update itself, while the AActor::MinNetUpdateFrequency property can be set to specify the minimum number of times per second that the Actor should attempt to update itself. These values are consulted to determine the Adaptive Network Update Frequency.
Client-Server Connection Process
- Client sends connection request
- Server accepts and sends the current map
- Server waits for client to load map
- Server calls
AGameModeBase::PreLogin, which may reject connection - Server calls
AGameModeBase::Login, which callsAPlayerController::BeginPlay. Not yet RPC safe. - Server calls
AGameModeBase::PostLogin. RPC safe.
Network Relevance
An Actor is replicated to a client when it’s considered network relevant to that client. By default this is determined by the distance of an Actor to a client through the AActor::NetCullDistanceSquared function, within the AActor::IsNetRelevantFor function.
An Actor that wishes to replicate must set its bReplicates member variable to true in its constructor.
The bAlwaysRelevant member variable can be set to force the Actor to always be relevant to all clients, so that it is always replicated.
The bNetUseOwnerRelevancy property can be set to make the Actor use its owner’s relevancy.
The bOnlyRelevantToOwner member variable can be set on an Actor whose owner is a PlayerController or a Pawn controlled by a PlayerController to specify that the Actor should only replicate to the player represented by the owning Pawn or PlayerController. This is set to true for PlayerControllers by default, which is why each client only receives updates for the PlayerControllers that it owns.
The bNetLoadOnClient member variable can be set on an Actor to cause it to load from a level file on a network client. This should be done for Actors placed in a map that should exist on a client.
The bTearOff member variable can be set by the Server and causes all clients to take authoritative control of their locally replicated versions of the Actor, so that changes to properties and RPCs will no longer be replicated over the network, essentially as if it were a locally spawned Actor.
The bReplicateMovement member variable can be set to allow the Actor to be moved and automatically have its position updated on clients. This is on by default on Pawns.
The default network relevancy uses a distance test, but it can be overridden:
bool AActor::IsNetRelevantFor(const AActor* RealViewer,
                              const AActor* ViewTarget,
                              const FVector& SrcLocation);
Each Actor has a floating-point NetPriority property that specifies the ratio that determines the level of bandwidth that it receives relative to other Actors, such that an Actor with a priority of 2.0 will be updated exactly twice as frequently as an Actor with priority 1.0.
By default, AActor::GetNetPriority prevents starvation by multiplying its NetPriority by the time since the Actor was last replicated.
Replicated Properties
UPropertys can be marked for network replication, so that when the server changes the variable, the Engine detects and replicates the change to all clients, each of which can optionally receive a callback function when the variable changes via replication. If a client changes the variable locally, it stays that way until overwritten by a server replication.
A property can be marked for replication with the Replicated property specifier.
UPROPERTY(Replicated)
float Health;
When the UHT encounters this property specifier, it automatically adds a declaration for the GetLifetimeReplicatedProps function. A definition for this function must be provided which specifies all of the properties that should be replicated via the DOREPLIFETIME macro, which will cause the property to replicate whenever it is changed.
virtual void AMyActor::GetLifetimeReplicatedProps(TArray<FLifetimeProperty>& OutLifetimeProps) const
{
  Super::GetLifetimeReplicatedProps(OutLifetimeProps);

  DOREPLIFETIME(AMyActor, Health);
}
This must be done unconditionally, since the function is only called once for the first instance, and uses the result of that call as the replication layout of the class, not that particular instance. Conditions can be added via the DOREPLIFETIME_CONDITION macro, which takes the same first two parameters as DOREPLIFETIME and an additional third parameter of ELifetimeCondition enumeration type.
/** Secondary condition to check before considering the replication of a lifetime property. */
enum ELifetimeCondition
{
  // This property has no condition, and will send anytime it changes
  COND_None = 0,
  // This property will only attempt to send on the initial bunch
  COND_InitialOnly = 1,
  // This property will only send to the actor's owner
  COND_OwnerOnly = 2,
  // This property send to every connection EXCEPT the owner
  COND_SkipOwner = 3,
  // This property will only send to simulated actors
  COND_SimulatedOnly = 4,
  // This property will only send to autonomous actors
  COND_AutonomousOnly = 5,
  // This property will send to simulated OR bRepPhysics actors
  COND_SimulatedOrPhysics = 6,
  // This property will send on the initial packet, or to the actors owner
  COND_InitialOrOwner = 7,
  // This property has no particular condition, but wants the ability to toggle on/off via SetCustomIsActiveOverride
  COND_Custom = 8,
  COND_Max = 9,
};
A PlayerController only exists on the owning-client and serves as the communication channel with the server.
A callback can be registered to invoke when a property value is updated via the ReplicatedUsing property specifier. The function takes no arguments and is called once the property has the new value. Property replication callbacks aren’t automatically called on the server.
UPROPERTY(ReplicatedUsing = OnRep_Flag)
uint32 bFlag;

UFUNCTION()
void OnRep_Flag();
Network Roles
One of three network roles is assumed by any replicated actor, each denoting the level of ownership the connection has over the actor:
ROLE_SimulatedProxy is assumed by the version of a replicated actor that exists on all other clients, purely for simulation purposes. In other words, it locally simulates the state of the object on the server, and has no authority to change the state of that object or call a function that executes remotely.
ROLE_AutonomousProxy is assumed by the version of a replicated actor that exists on the owning client. This can be used to send and receive direct RPCs to and from the server.
ROLE_Authority is assumed by any replicated actor that exists on the server. It can call functions on any object to execute on the server, or on ROLE_SimulatedProxy and ROLE_AutonomousProxy. It also automatically replicates any changes to properties marked Replicated. This role can be checked for with the AActor::HasAuthority function.
For example, a client A’s actor exists on the server with a ROLE_Authority role, on client A with a ROLE_AutonomousProxy role, and on all other clients with a ROLE_SimulatedProxy role.
Remote Procedure Calls
UFunctions can also be marked to execute on a remote machine, in which case they are referred to as Remote Procedure Calls (RPCs). RPCs are called locally but executed remotely. For example, a function marked Server that is called on a client causes that function to be invoked on the server, and vice versa. An owning client can invoke an RPC on the server instance of the client’s actor.
RPCs are Unreliable by default. To make an RPC reliable, it must have the Reliable property specifier in the UFUNCTION macro.
A validation function can be defined for an RPC call through the use of the WithValidation function specifier. This is required for RPCs of type Server.
There are three types of RPCs.
A Client RPC should be called from the server, to be executed on the actor’s owning client, i.e. the client instance with ROLE_AutonomousProxy. If a client or non-owning client executes a Client RPC, it is only executed locally.
A Server RPC should be called from the owning client, to be executed on the server. If a non-owning client executes a Server RPC, the function is dropped and not executed. RPCs of type Server also require the WithValidation parameter.
A NetMultiCast RPC can be called from the server in order to execute on both the server and all connected clients, even those with ROLE_SimulatedProxy. If a client or non-owning client executes a NetMultiCast RPC, it is only executed locally.
A convention is to prepend RPC function names with the type of RPC it is, e.g. ServerFireWeapon().
The UHT detects RPC declarations and adds declarations for the implementation and optionally the validation function, which must then be defined by the user.
UFUNCTION(Client, WithValidation)
void SomeCall();

// Generates:
// Implementation function.
void SomeCall_Implementation();
// Validation function.
bool SomeCall_Validate();
Replicated State
GameState can be used to replicate game-related information to all players. PlayerState can be used to share player-related information to all players.
Only the server may spawn actors. Actors spawned on a client will only exist on that client.
Event-based replication should be used to replicate a lot of state to clients with a single method call which effects those changes locally instead of literally replicating various changes to the data. By extension, this should also be done so that clients may spawn certain local-only objects locally.
All replicated properties are replicated reliably, whereas functions may be reliable or unreliable.
Actor components and sub-objects should call SetReplicates(true) to have them replicate.
Custom Object Replication
A custom UObject subclass may be replicated by overriding UObject::IsSupportedForNetworking to return true and implementing UObject::GetLifetimeReplicatedProps.
#pragma once
#include "Core.h"
#include "ReplicatedSubobject.generated.h"

UCLASS()
class UReplicatedSubobject : public UObject
{
  GENERATED_UCLASS_BODY()

public:
  UPROPERTY(Replicated)
  uint32 bReplicatedFlag:1;

  virtual bool IsSupportedForNetworking() const override
  {
    return true;
  }
};
#include "UnrealNetwork.h"

UReplicatedSubobject::UReplicatedSubobject()
{
}

void UReplicatedSubobject::GetLifetimeReplicatedProps(TArray<FLifetimeProperty>& OutLifetimeProps) const
{
  Super::GetLifetimeReplicatedProps(OutLifetimeProps);

  DOREPLIFETIME(UReplicatedSubobject, bReplicatedFlag);
}
An Actor that wishes to replicate this object as a sub-object should then store it as a property and implement AActor::ReplicateSubobjects.
#pragma once
#include "Core.h"
#include "ReplicatedSubobject.h"
#include "AReplicatedActor.generated.h"

UCLASS()
class AReplicatedActor : public AActor
{
  GENERATED_UCLASS_BODY()

public:
  virtual void PostInitializeComponents() override;
  virtual bool ReplicateSubobjects(class UActorChannel *Channel,
                                   class FOutBunch *Bunch,
                                   FReplicationFlags *RepFlags) override;

  // A Replicated Subobject
  UPROPERTY(Replicated)
  UReplicatedSubobject* Subobject;
};
#include "ReplicatedActor.h"
#include "UnrealNetwork.h"
#include "Engine/ActorChannel.h"

AReplicatedActor::AReplicatedActor()
{
  bReplicates = true;
}

void AReplicatedActor::PostInitializeComponents()
{
  Super::PostInitializeComponents();

  if (HasAuthority())
  {
    // Object's Outer must be this Actor.
    Subobject = NewObject<UReplicatedObject>(this);
  }
}

bool AReplicatedActor::ReplicateSubobjects(UActorChannel *Channel,
                                           FOutBunch *Bunch,
                                           FReplicationFlags *RepFlags)
{
  bool WroteSomething = Super::ReplicateSubobjects(Channel, Bunch, RepFlags);

  if (Subobject)
  {
    WroteSomething |= Channel->ReplicateSubobject(Subobject, *Bunch, *RepFlags);
  }

  return WroteSomething;
}

void AReplicatedActor::GetLifetimeReplicatedProps(TArray<FLifetimeProperty>& OutLifetimeProps) const
{
  Super::GetLifetimeReplicatedProps(OutLifetimeProps);

  DOREPLIFETIME(AReplicatedActor, Subobject);
}
Dedicated Server
The dedicated server build is only possible when building the Engine from source.
Certain code paths that are purely graphical in nature can be skipped on the server by testing if it’s running on the dedicated server:
if (GEngine->GetNetMode(GetWorld()) != NM_DedicatedServer)
{
  // Code for non-dedicated servers.
}
Server Travel
Seamless travel is a non-blocking operation compared to non-seamless travel.
The UEngine::Browse function is like a hard reset when loading a new map. It performs a non-seamless travel which results in the server disconnecting the current clients before traveling to the destination map.
The UWorld::ServerTravel function is only for the server to jump to a new world, resulting in all of the clients following by calling APlayerController::ClientTravel for all connected clients.
The APlayerController::ClientTravel function, travels to a new server when called from a client, or when called from a server instructs the client to travel to the new map while remaining connected to the current server.
Seamless travel can be enabled through the AGameModeBase::bUseSeamlessTravel property.
Seamless travel requires a transition map specified through the UGameMapsSettings::TransitionMap property. When empty (the default), an empty map is created for the transition map. A transition map is necessary because there must always be a world loaded, so it serves as an intermediate map while the new map finishes loading, and for this reason it should be small.
Seamless travel is achieved by marking all actors that will persist to the next loaded map. The following persist automatically:
GameMode(server) and any Actors added viaAGameModeBase::GetSeamlessTravelActorList- Controllers with a valid
PlayerState(server) - Local PlayerControllers (server and client) and any Actors added via
APlayerController::GetSeamlessTravelActorList
Online Beacons
Online Beacons are a type of Actor that provide a lightweight way to communicate with a server via RPCs without committing to a regular game connection.
The AOnlineBeaconHost class uses its own UNetDriver to listen for incoming Online Beacon connections. On each connection it performs a lookup on its registered AOnlineBeaconHostObject instances to find the one that matches the incoming client, then hands off the connection to it.
The AOnlineBeaconHostObject class should be derived in order to pair with a derived AOnlineBeaconClient class. This pairing is made by matching on the return value of the AOnlineBeaconClient::GetBeaconType function with the value of AOnlineBeaconHostObject::BeaconTypeName property. When the server finds a match, it instructs the AOnlineBeaconHostObject to spawn a local copy of the AOnlineBeaconClient via the virtual function AOnlineBeaconHostObject::SpawnBeaconActor function which by default uses the AOnlineBeaconHostObject::ClientBeaconActorClass property to determine the class of the actor to spawn, so it should be set to the paired AOnlineBeaconClient class.
The AOnlineBeaconClient class connects to hosts and invokes RPCs. One is spawned on the client and another is spawned on the server by the appropriate AOnlineBeaconHostObject class registered with the server’s AOnlineBeaconHost. The virtual functions OnConnected and OnFailure can be overridden to perform RPCs when connected or handle failures to connect.
-
As if it’s done via TCP or some other reliability protocol over UDP. ↩︎
-
This seems to be based on
FString::Printf. ↩︎ -
Think exterior AND, interior OR. ↩︎